Prerequisites
-
For the best editing experience, we recommend using a modern browser based on the Google Chrome engine (such as Chrome, Edge, or Brave) to access the website admin panel. Browsers like Safari or Internet Explorer may cause compatibility issues.
-
This website is built on WordPress and uses the Elementor page builder. To modify pages or manage content, users should be familiar with basic web editing operations.
-
Before logging into the admin panel, ensure you have an account with Administrator or Editor privileges. If you need a new account, please contact your site administrator.
-
Before launching the website, please prepare the following materials:
- School/center logo and branding colors
- Website text content (e.g., About Us, Programs, Contact)
- Image assets (photos of your preschool, activities, classrooms, etc.)
- Course descriptions or enrollment information, if applicable
-
If you plan to connect third-party tools (such as Google Analytics, Facebook Pixel, or online registration forms), please prepare the required accounts and embed codes in advance.
-
For system-related inquiries, please contact: support@preschool.zone
How to Launch Your Preschool Website with Us
Follow these steps to get your school’s website online quickly and smoothly:
✅ 1. Prepare Basic Materials
Please gather the following items before getting started:
- Your preschool's logo
- Contact phone number and email address
- School address
- High-quality photos of your facilities or classrooms
🌐 2. Choose Your Subdomain
Pick a subdomain you like, such as:
sunshine.preschool.zone
⚠️ All websites under our service use the
.preschool.zonedomain.
🎨 3. Select a Theme
We offer 20+ WordPress themes tailored for preschools. You can switch themes at any time.
Please note: when changing a theme, all pages and layouts under the previous theme will also be replaced accordingly.
🖋️ 4. Customize Your Content
Update the default content to reflect your own preschool:
- Replace sample images with real photos from your school
- Edit all text content to match your programs and values
⚠️ Important: All sample images and demo content included in our themes are licensed for in-service use only. You may not use them outside of this platform.
📰 5. Start Publishing School Updates
Use the WordPress blog feature to post announcements, event news, or educational tips for parents.
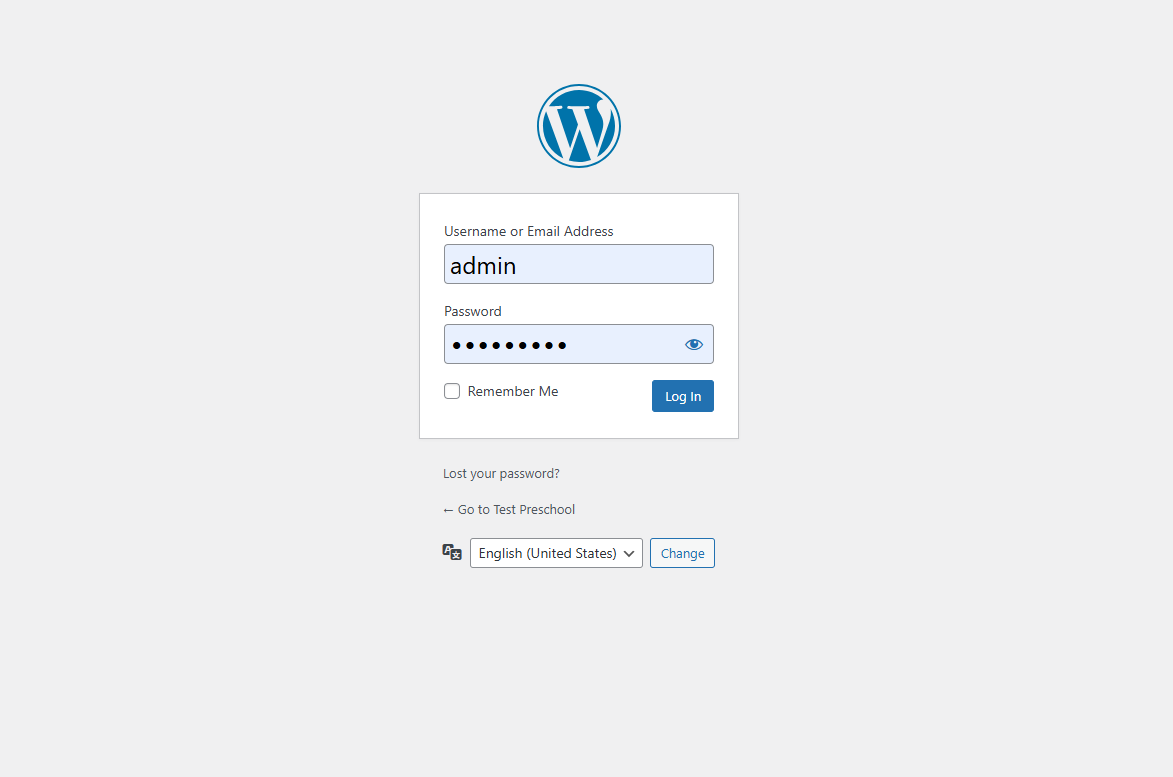
Logging In to the WordPress Admin Panel
1. Open the Login Page
Visit the following URL in your browser:
https://yourdomain.preschool.zone/wp-admin
📌 Replace yourdomain with your actual subdomain (e.g., sunshine.preschool.zone)
2. Enter Your Credentials
- In the Username or Email Address field, enter your account.
- In the Password field, enter your assigned password.
- (Optional) Check Remember Me to stay logged in on this device.
- Click the blue [Log In] button.
📷 Screenshot:
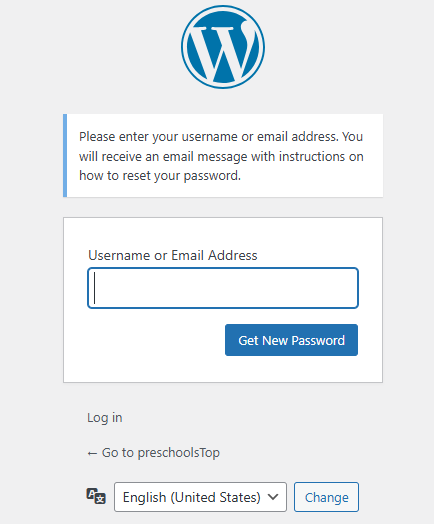
3. Forgot Your Password?
Click “Lost your password?” and follow the reset instructions. You will receive a password reset link via your registered email address.
4. Language Selection
If needed, change the login page language using the dropdown below the login form.
✅ Login Success
After logging in, you will be redirected to the WordPress Dashboard, where you can:
- Create or edit pages
- Customize your site using Elementor
- Manage posts, menus, media, and more
Successful Login – Welcome to Your Preschool Website Dashboard
After logging in successfully, you’ll be redirected to the WordPress Dashboard — the main control center of your preschool website.
📷 Below is your actual dashboard interface:
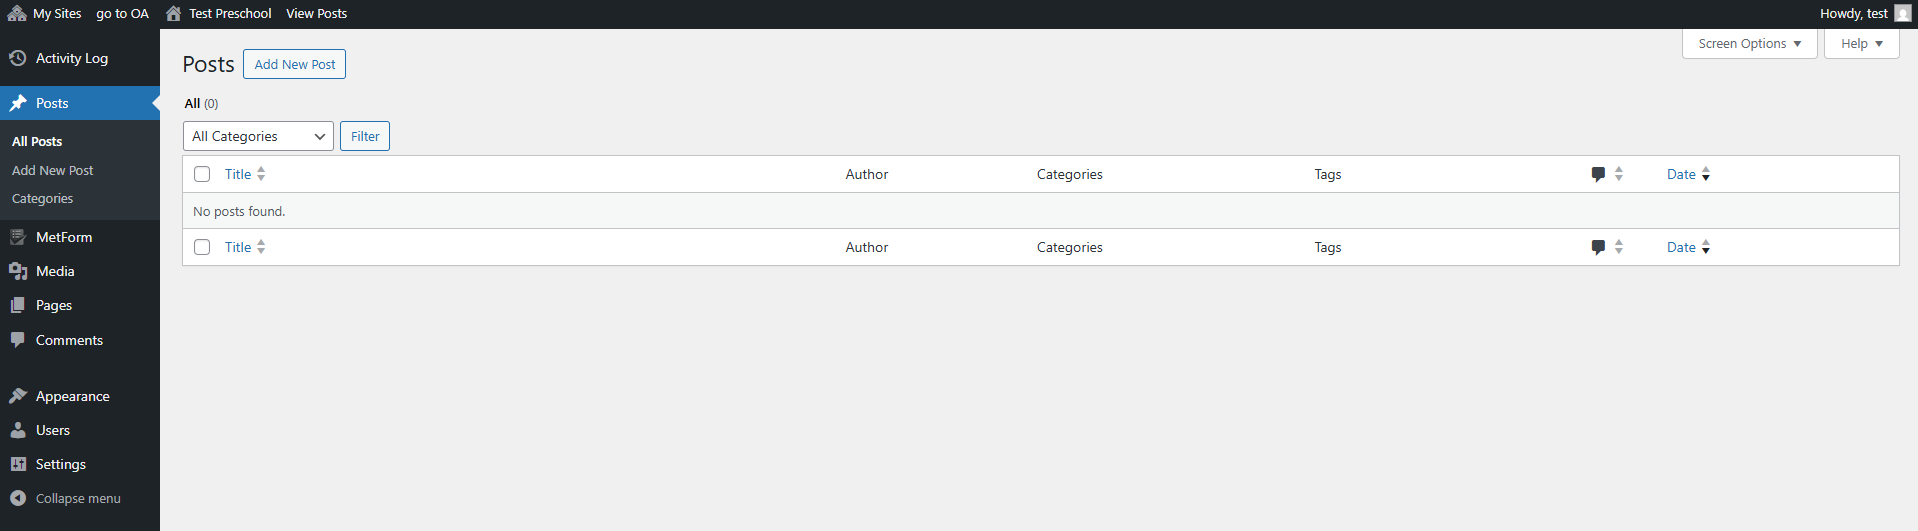
🔍 Dashboard Overview
From the left-hand menu, you can manage all aspects of your site:
| Menu Item | Description |
|---|---|
| Activity Log | View a complete history of user actions such as page edits, post creation, plugin changes, login/logout events. Useful for tracking updates and ensuring accountability. |
| Posts | Publish school news, activity updates, or announcements |
| Media | Upload and manage your photos, videos, PDFs, etc. |
| Pages | Edit and add static pages like "About Us", "Programs", or "Contact" |
| Comments | Moderate parent or visitor comments (if enabled) |
| Appearance | Customize your theme, menus, widgets, and site identity |
| Users | Manage site admins, editors, and staff accounts |
| Settings | Control site settings including language, timezone, and permalinks |
📌 Quick Actions You Can Take:
- Click 【Add New Post】 to start writing your first preschool blog update.
- Navigate to Pages → Add New to begin building your homepage, program page, etc.
- Use Media to upload your school logo and environment photos.
- Click Appearance → Menus to add pages to the website’s top navigation.
🔐 Security Tip:
Make sure to log out after finishing work, especially on public or shared computers.
How to Switch Website Themes
For Preschools Using Our WordPress Site Builder
🧭 Step-by-Step Guide
1. Go to the Theme Management Page
- After logging into the WordPress admin panel, click Appearance → Themes in the left sidebar.
- You will see all available preschool themes displayed in a grid layout.
📷 Screenshot:
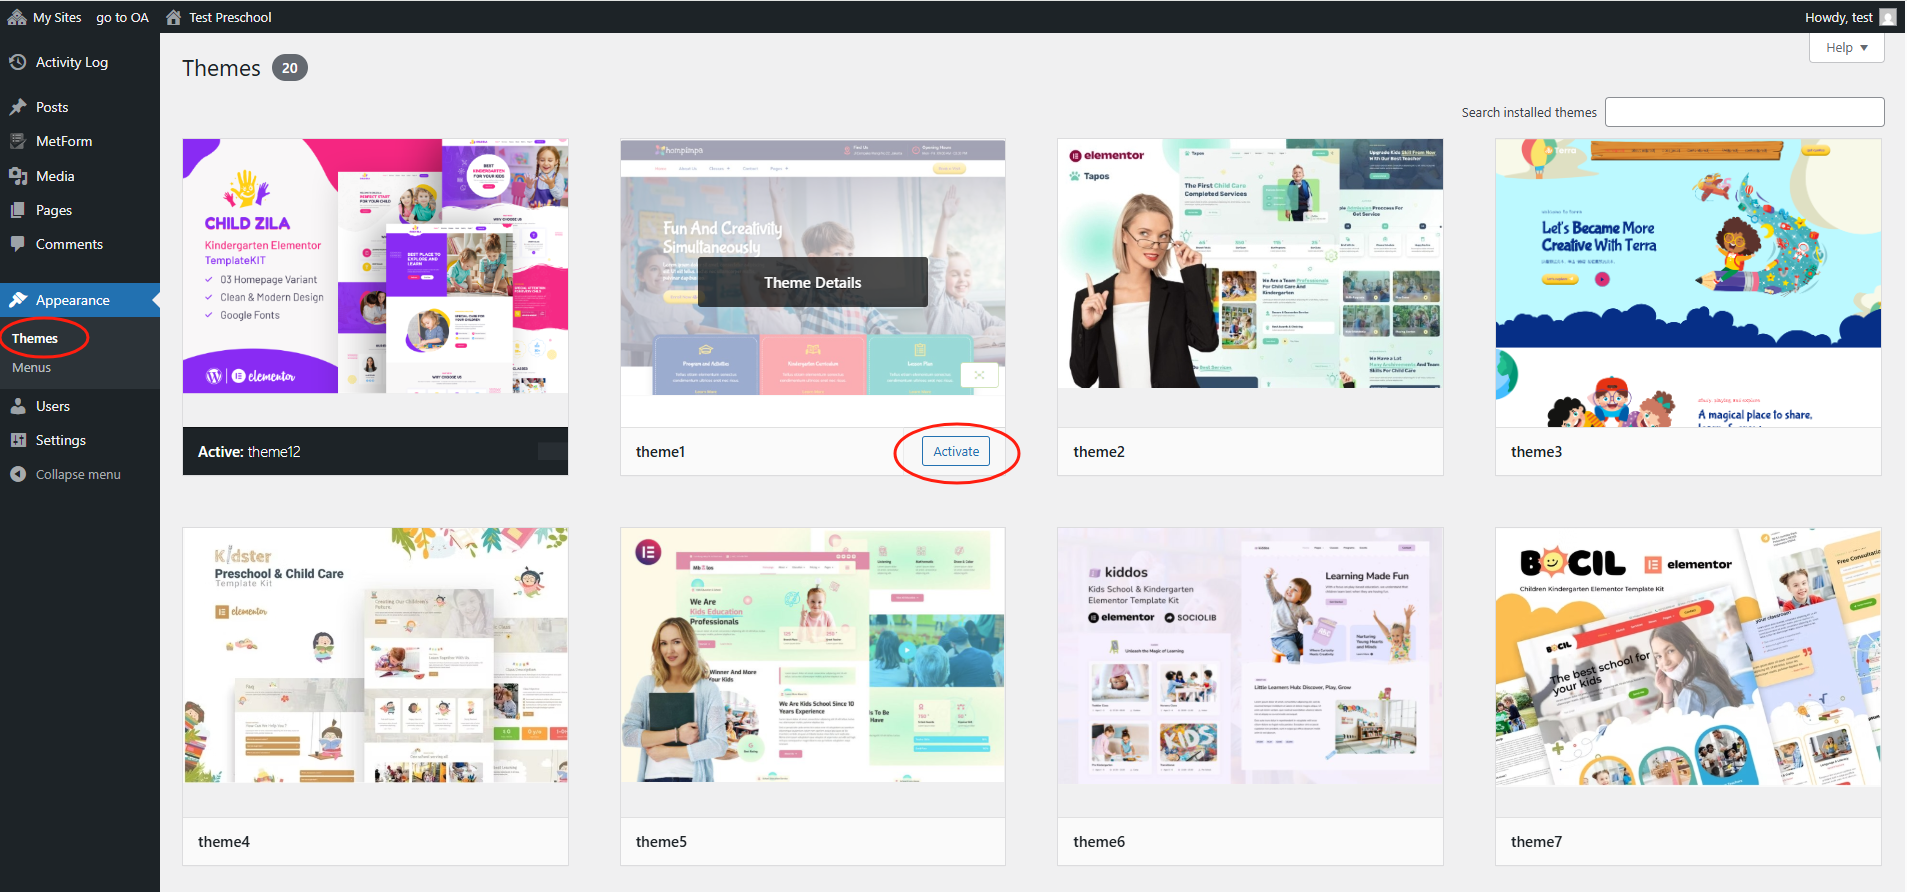
2. Preview Available Themes
- Hover your mouse over any theme thumbnail to view more details.
- Click “Theme Details” for a larger preview and information.
You can browse through over 20 kindergarten-specific themes that we’ve provided.
3. Click “Activate” to Apply a Theme
- To use a theme, simply click the blue [Activate] button on that theme card.
- The system will automatically apply the new theme, and the current one will be deactivated.
📌 The Active theme is marked at the bottom of the thumbnail (e.g., Active: theme12).
🚨 Important Notes
- Switching a theme will also load its own set of demo pages and layout structure.
- You may need to re-customize images and text content after switching.
- If you’ve customized a previous theme, those changes will not carry over unless saved via reusable templates or backups.
✅ Tips
- All themes are compatible with Elementor, so you can continue editing visually.
- You may switch themes anytime, but we recommend finalizing your content on one theme to maintain consistency.
📧 Need Help? If you’re unsure which theme to choose or how to customize it, contact: support@preschool.zone
Comments
Comments allow your website’s visitors to have a discussion with you and each other. When you activate comments on a Page or post, WordPress inserts several text boxes after your content where users can submit their comments. Once you approve a comment, it appears underneath your content. Whether you want to customize how you receive comments or tweak how your site displays comments, WordPress provides a thorough set of options to build a community from the visitors to your site.
Comment screen
All comments on a WordPress website are displayed on the Comments dashboard in your WordPress admin area. It displays all comments by default

You can switch the view to see Pending, Approved, Spam, and Trash comments:
- Pending: comments submitted by your visitors, but won’t be visible on your blog posts unless you approve them.
- Approved: comments published and are publicly visible on your blog posts by all your website visitors.
- Spam: comments flagged as possibly unwanted or irrelevant, and aren’t visible to your site visitors.
- Trash: comments marked as unwanted and will be automatically deleted for good after 30 days.
Moving your mouse over to a comment will display the action links for it. You can approve a comment to make it visible to all your site visitors, or unapprove it to put it in pending status again.
You can also reply to comments. By replying to a specific comment, your reply will appear right under that comment. This is called “threaded” or “nested” comments.
You can also choose to edit anyone’s comments on your own site. The Quick Edit option opens a text area so you can edit the comment without reloading the page. Edit, on the other hand, gives you more options to edit the name, user email, and more.
Once a visitor submits his or her comment, WordPress follows your preferences and either hold the comment for your approval or posts it immediately.
If you see a comment marked as spam that’s actually a real comment, then you can mark it as Not Spam by hovering your mouse over it.
Comments in the trash section are comments that have been deleted by you. Any comment in the trash can be restored by clicking on Restore. Comments in trash remain there for 30 days after this time WordPress deletes them permanently.
Discussion settings
Before you enable comments on posts or Pages, reviewing the options under Settings > Discussion can help make your life as a moderator easier. Use these settings to restrict comments and reduce the amount of spam you receive.
Notification

If you link another site post on your site, Attempt to notify any blogs linked to from the post will enable your site to notify the website owners that you have linked to them. They can then choose to tell their users that another site linked to them through a trackback or pingback.
Just like the option above, you can enable your site to accept pingbacks and trackbacks from other websites by checking Allow link notifications from other blogs (pingbacks and trackbacks) on new posts.
Comment rules
Allow people to post comments on new articles will enable you to disable comments if you don’t need comments on your websites.

Comment author must fill out name and e-mail prevents people from leaving anonymous comments.
Users must be registered and logged in to comment will only allow registered users of your site to post comments.
Automatically close comments on articles older than _____ days will close comments on a post that have reached a set time. This is a good way to limit spam comments.
Comment display
Enable threaded (nested) comments _____ levels deep: will allow your users to reply to one another. A reply to a comment is shown “nested” underneath the original comments. You can limit how many levels (a reply to a reply) of replies your site will allow by changing the number of levels.
Break comments into Pages with _____top level comments per Page and the _____ Page displayed by default will change how your comments are displayed. You can set how many comments you see per Page and if the oldest or newest comments are displayed first.
Comments should be displayed with the _____ comments at the top of each Page will place newer or older comments at the top of each page.

Comment administration
Email me whenever … Anyone posts a comment and/or A comment is held for moderation will help you stay up to date on your comments. If you don’t check your site often.
Comment must be manually approved will help you moderate the comments published on your site.
Comment author must have a previously approved comment will help moderate the comments published on your site.
Comment spam

Hold a comment in the queue if it contains _____ links, Spam comments are designed to get users to click on links in order to drive traffic to other sites. As a result, many spam comments contain multiple links. Setting this option to hold all comments that contain 2 or more links will help catch more spam.
You can experiment with Comment Moderation and Comment Blacklist to catch spam that contains certain words or is posted from a particular IP address. Comments caught through blacklisting are not deleted but instead moved to your spam folder.
Because spam is pervasive on the Web, some of the comments you receive will most likely be spam. However, WordPress developers and administrators have already developed a number of successful strategies to help you prevent spam comments from appearing on your site. In addition to experimenting with different options in Settings > Discussion, you can install a WordPress Plugin like Akismet or make other changes to help you keep spam comments under control.
Avatars
The settings under “Avatars” control the images your site displays next to comments. For an introduction to Gravatars, read the WordPress Lesson about How to Use Gravatars in WordPress.
Enabling comments on your site
Once you have decided on your discussion options, you are ready to enable comments. If you chose not to enable comments on all articles automatically, you can turn on comments for a specific post or Page in several ways.
Turning on comments from the posts or pages screen

Navigate to the Posts/Pages screen. In the list of pages or posts, find the one you want and hover your cursor over the title of the post. You will see several links appear underneath the title. Click “Quick Edit” and check “Allow Comments.” Click “Update” to turn comments on for that post.
Turning on comments for multiple posts or pages
From the Posts/Pages screen, check the boxes next to the posts or Pages on which you want to enable comments. Select “Edit” from the “Bulk Edit” Dropdown box and click Apply. Then, select “Allow” next in the Comments dropdown box and finish by clicking “update.”
Create a New Page Using Elementor
When using a multi-theme preschool site, it’s important to follow naming conventions and editing rules for newly added pages. Below is the complete process.
🧭 Overview
You can now create pages directly using Elementor, with the default theme layout (header + footer) already included. The workflow is fast, intuitive, and requires only editing the content area.
✏️ Step-by-Step Guide
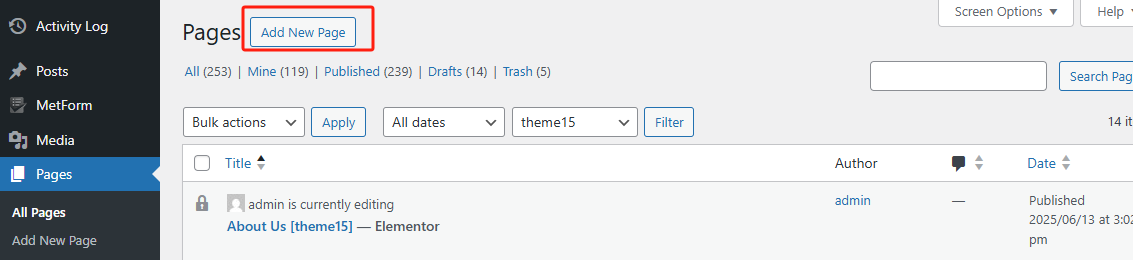
1. Navigate to “Add New Page”
From the admin menu:
- Click Pages→ Add New Page
- Or go to Pages → Add New Page
📷 See Screenshot 1 – “Add New Page” Button
2. Switch to “Edit with Elementor”
Once the default editor loads, click the blue button 【Edit with Elementor】.
📷 See Screenshot 2 – Edit with Elementor & Select Template
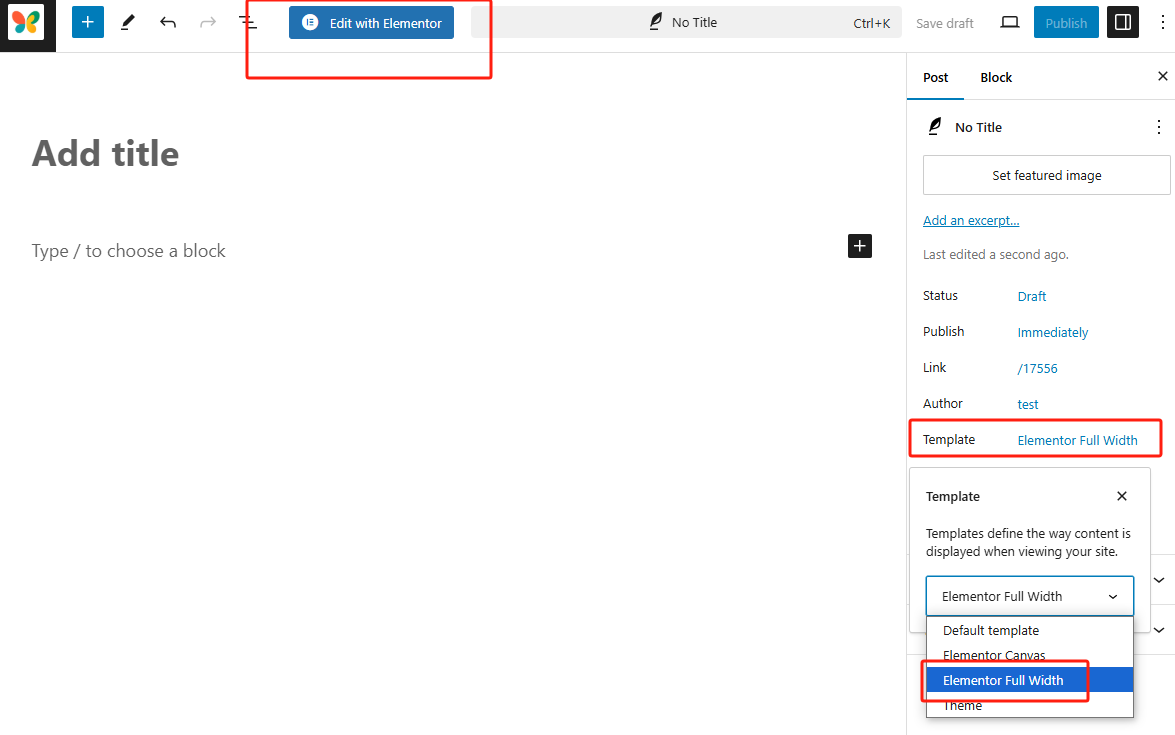
💡 Make sure the Template (under Page settings) is set to:
Elementor Full Width This ensures header/footer layout loads correctly.
3. Start Building with Elementor
You will be redirected to the Elementor visual editor. Here’s how to build your content:
-
Click the “+” icon to add a new section 📷 See Screenshot 4 – Add New Section
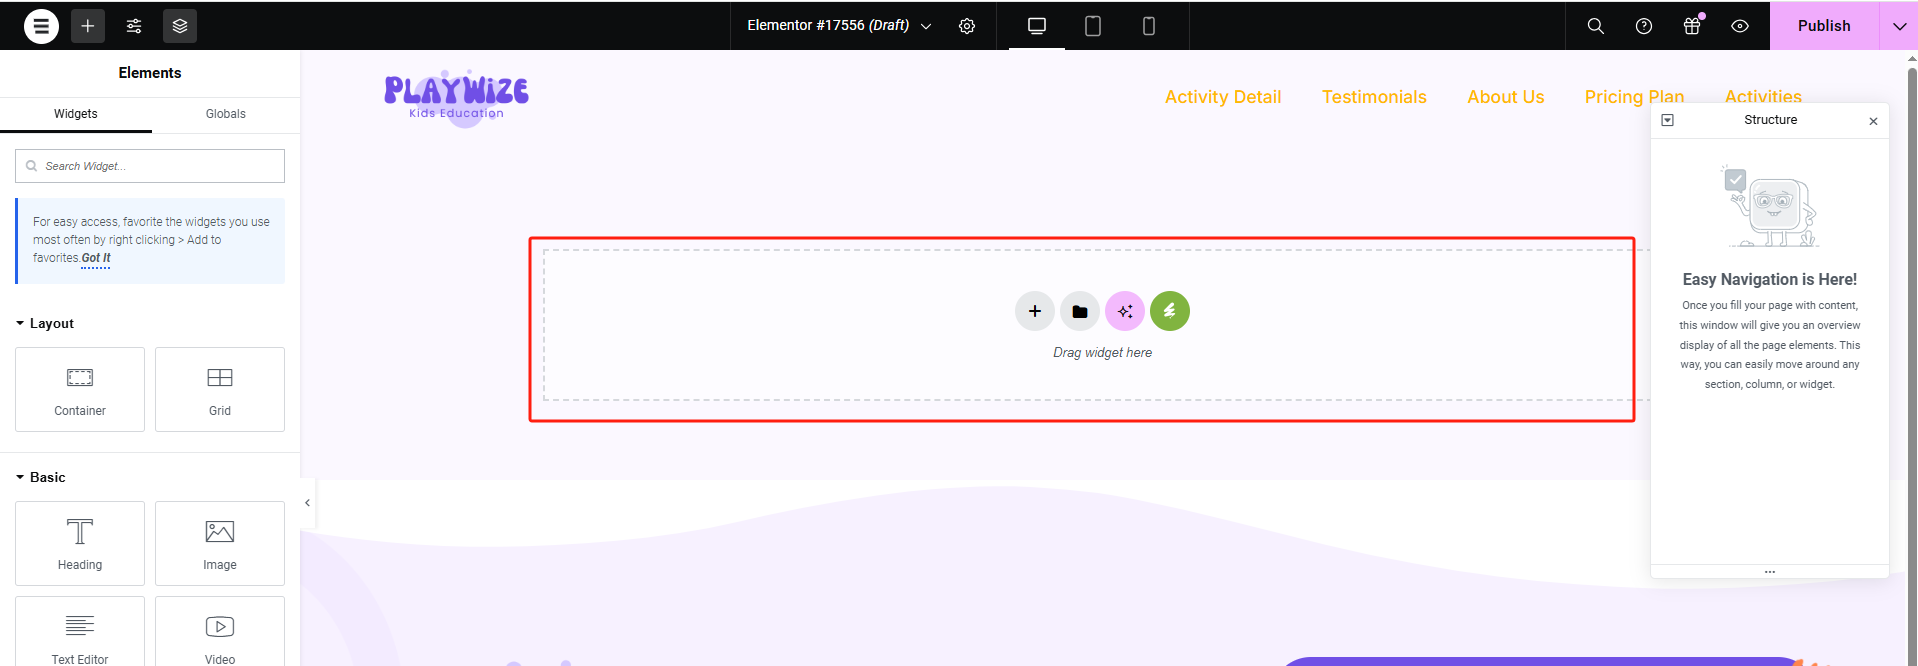
-
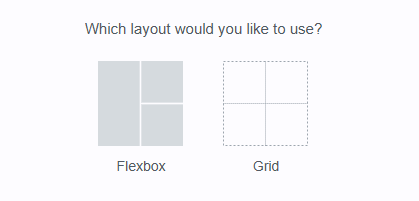
Choose a layout: Flexbox or Grid 📷 See Screenshot 5 – Layout Options
-
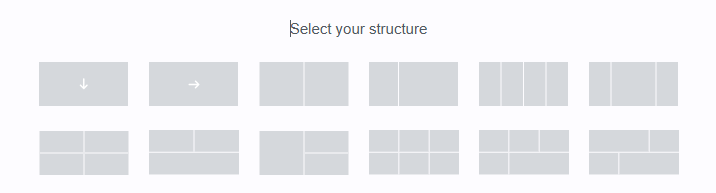
Select a section structure (e.g., single column, 2-column) 📷 See Screenshot 6 – Section Structure Selector
-
Drag widgets from the left panel into the canvas area 📷 See Screenshot 7 – Add Image/Text/Heading/Video
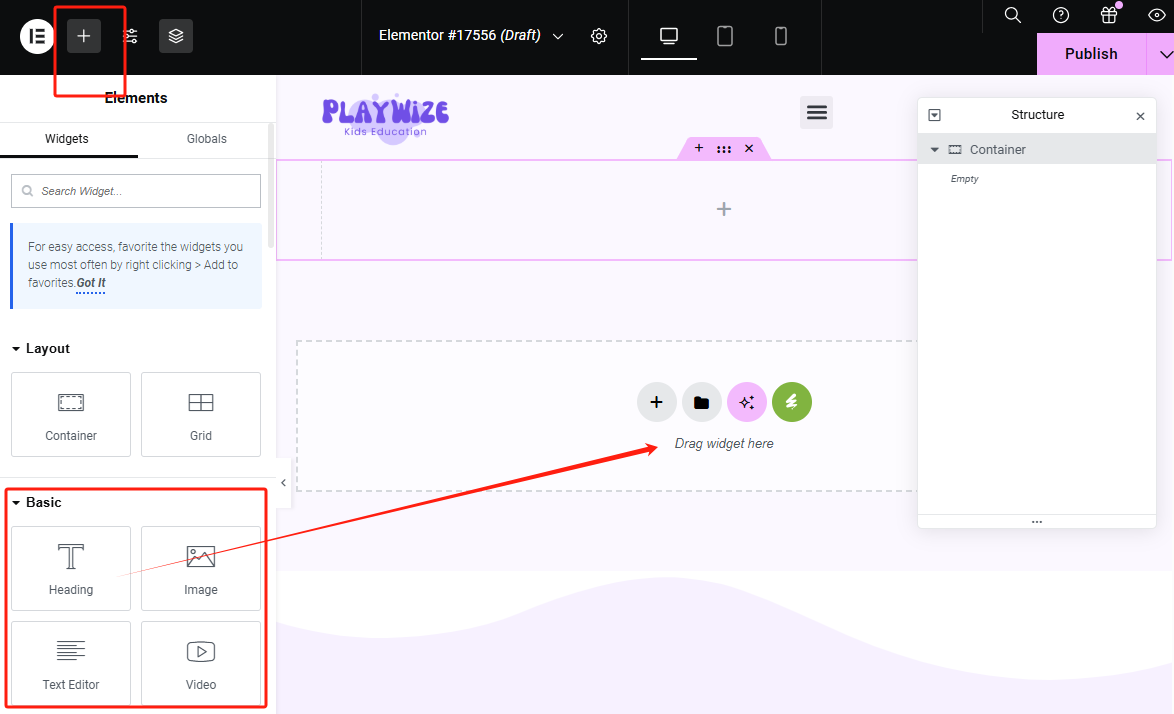
-
Use the Structure Panel on the right for hierarchy view 📷 See Screenshot 8 – Page Structure Tree
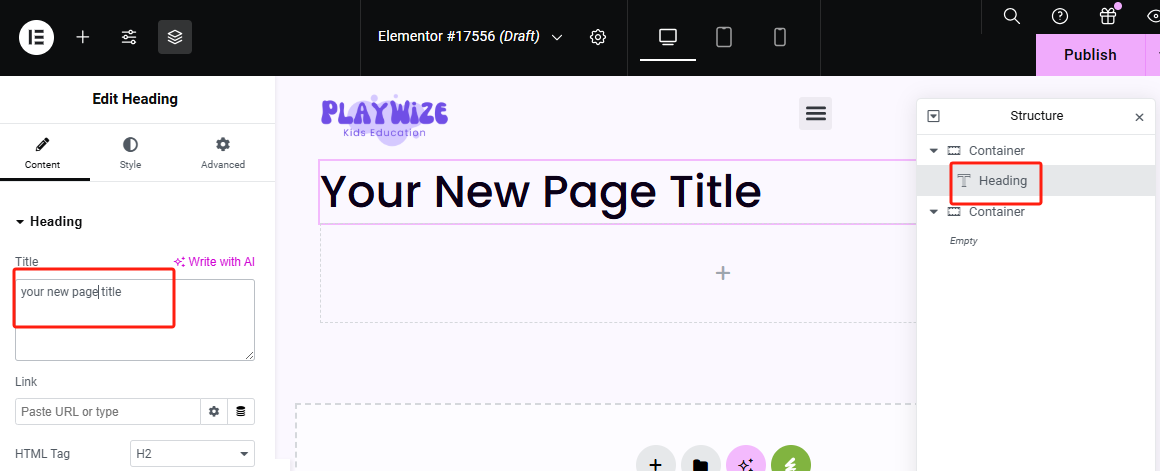
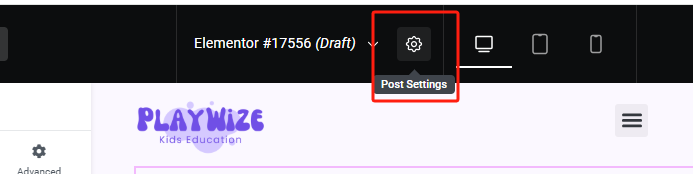
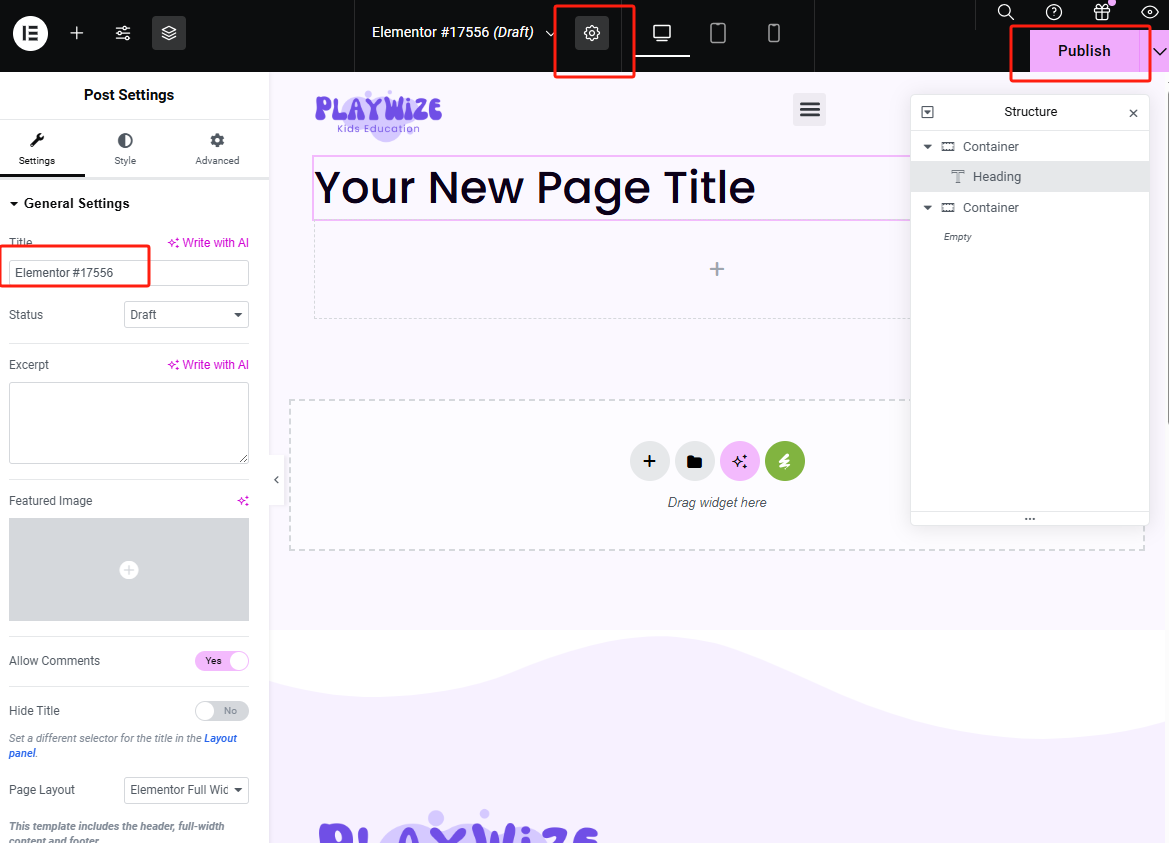
4. Update the Page Title
Click the gear icon in the top corner for Post Settings In the Title field:
✅ Please follow this naming rule:
Page Name [theme13]
📷 See Screenshot 9 – Post Settings & Title Format
📝 theme13 refers to your currently activated theme. This helps distinguish pages from different templates.
5. Finalize and Publish
-
Once done editing content, click the 【Publish】 button on the top-right 📷 See Screenshot 10 – Final Publish
✅ Key Tips
- The header and footer come from the active theme and load automatically.
- You don’t need to build layout from scratch — just focus on your main content.
- Avoid using the default Gutenberg editor for visual layout pages.
- Always name new pages using [themeName] tag to maintain structure.
📧 Need help with layout? Contact: support@preschool.zone
Create Post
To create a post, you can refer to the same steps as Create Page, since the editing process is similar using Elementor. However, please note: Posts are not bound to any specific theme, which means they will appear consistently across all themes, regardless of which one is currently active.
Add a Page to the Navigation Menu
After creating a new page, it won’t show in your site’s navigation until it’s manually added to the theme menu. Here’s how to do it step by step.
🔧 Step-by-Step Guide
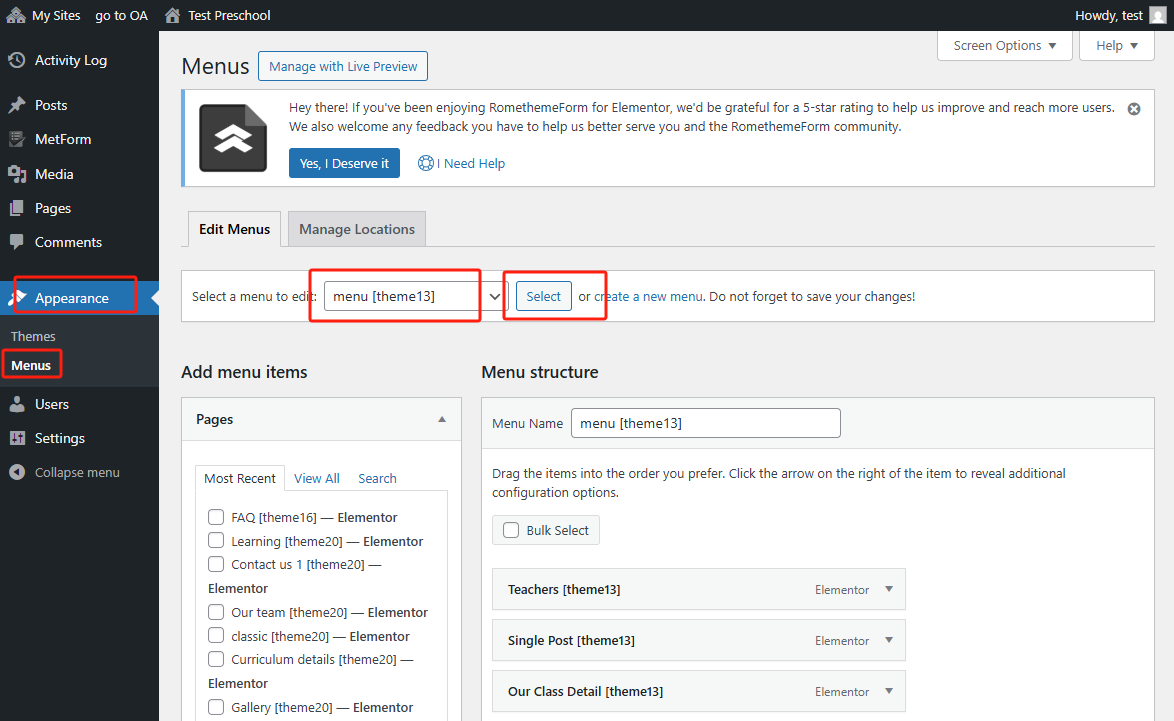
1. Open Menu Management
-
Go to Appearance → Menus
-
In the “Select a menu to edit” dropdown, choose the one matching your active theme — for example:
menu [theme13] -
Click the 【Select】 button.
📷 See Screenshot 1 – Select menu to edit
2. Search for Your Page
In the “Add menu items” section:
-
Click the Pages tab → Search
-
Type the name of the page you just created, e.g.:
test page [theme13] -
Check the checkbox next to your page.
-
Click the 【Add to Menu】 button.
📷 See Screenshot 2 – Add new page to menu
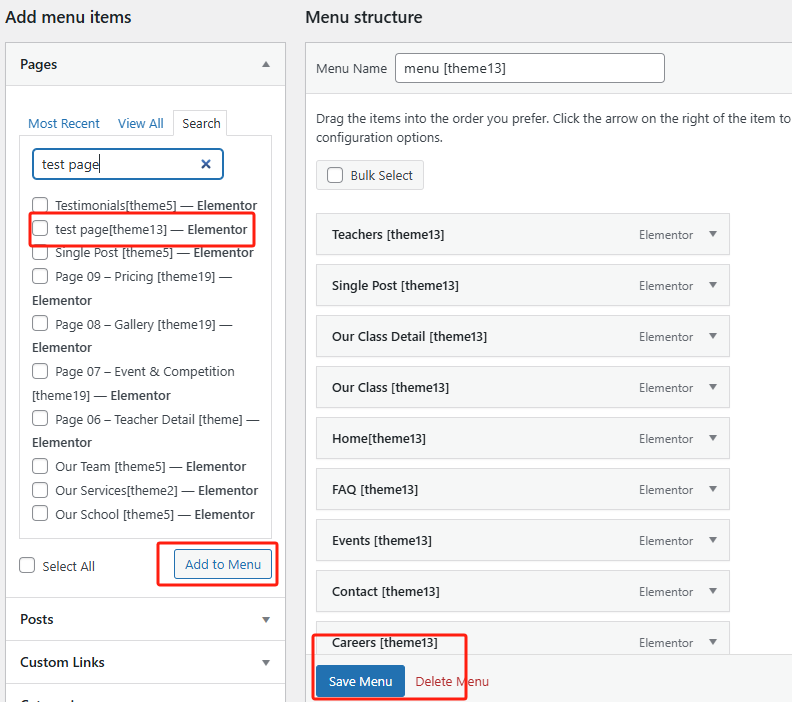
3. Save the Menu
Once the page appears under Menu structure on the right side:
- You can drag it to reorder if needed.
- Finally, click the blue 【Save Menu】 button.
✅ Tips
- Be sure you're editing the correct menu that matches the active theme.
- Only published pages will show up in the menu search.
- Menu item labels can be renamed by expanding the item and editing the text field.
📧 For assistance with menus, contact us at: support@preschool.zone
Editing Page Content After Switching Themes
Example: Modify Your “Contact Us” Page Using Elementor
🔄 Why This Matters
After switching to a new theme, your website may load a different set of demo pages. To personalize these pages (such as updating your address, images, contact form, or Google Maps), you’ll need to edit each page with Elementor.
This example shows how to modify the Contact Us page.
✏️ Step-by-Step Instructions
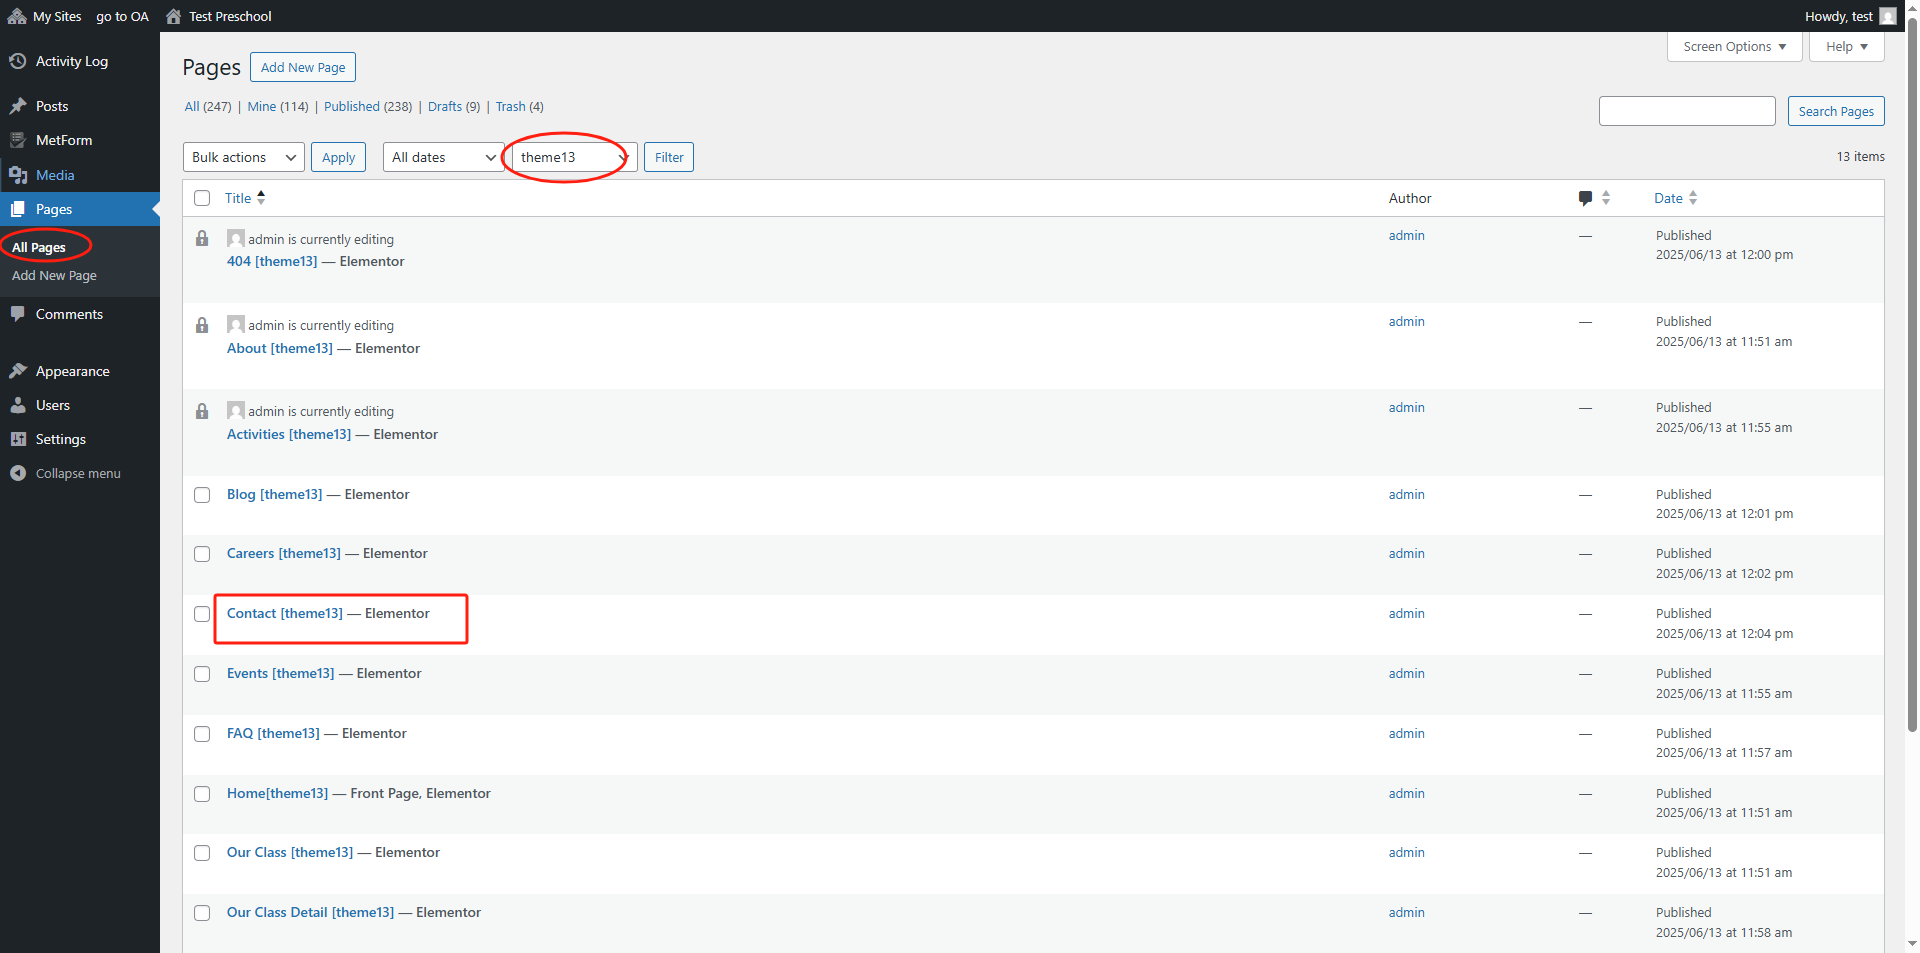
1. Go to “Pages” → “All Pages”
In your WordPress admin dashboard:
- Click Pages → All Pages
- Use the search box to find your current theme pages (e.g.,
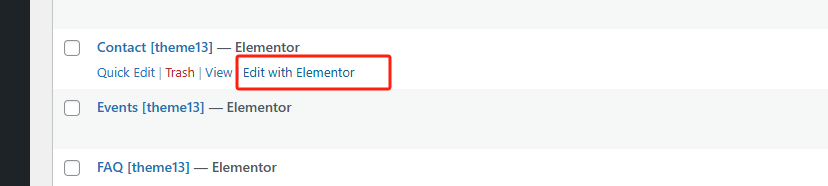
theme13) - Locate the page named Contact [theme13] — Elementor
📷 See Screenshot #1 – Page List with Theme Tag
2. Click “Edit with Elementor”
- Hover over the Contact page title
- Click the Edit with Elementor link
📷 See Screenshot #2 – Edit with Elementor Button
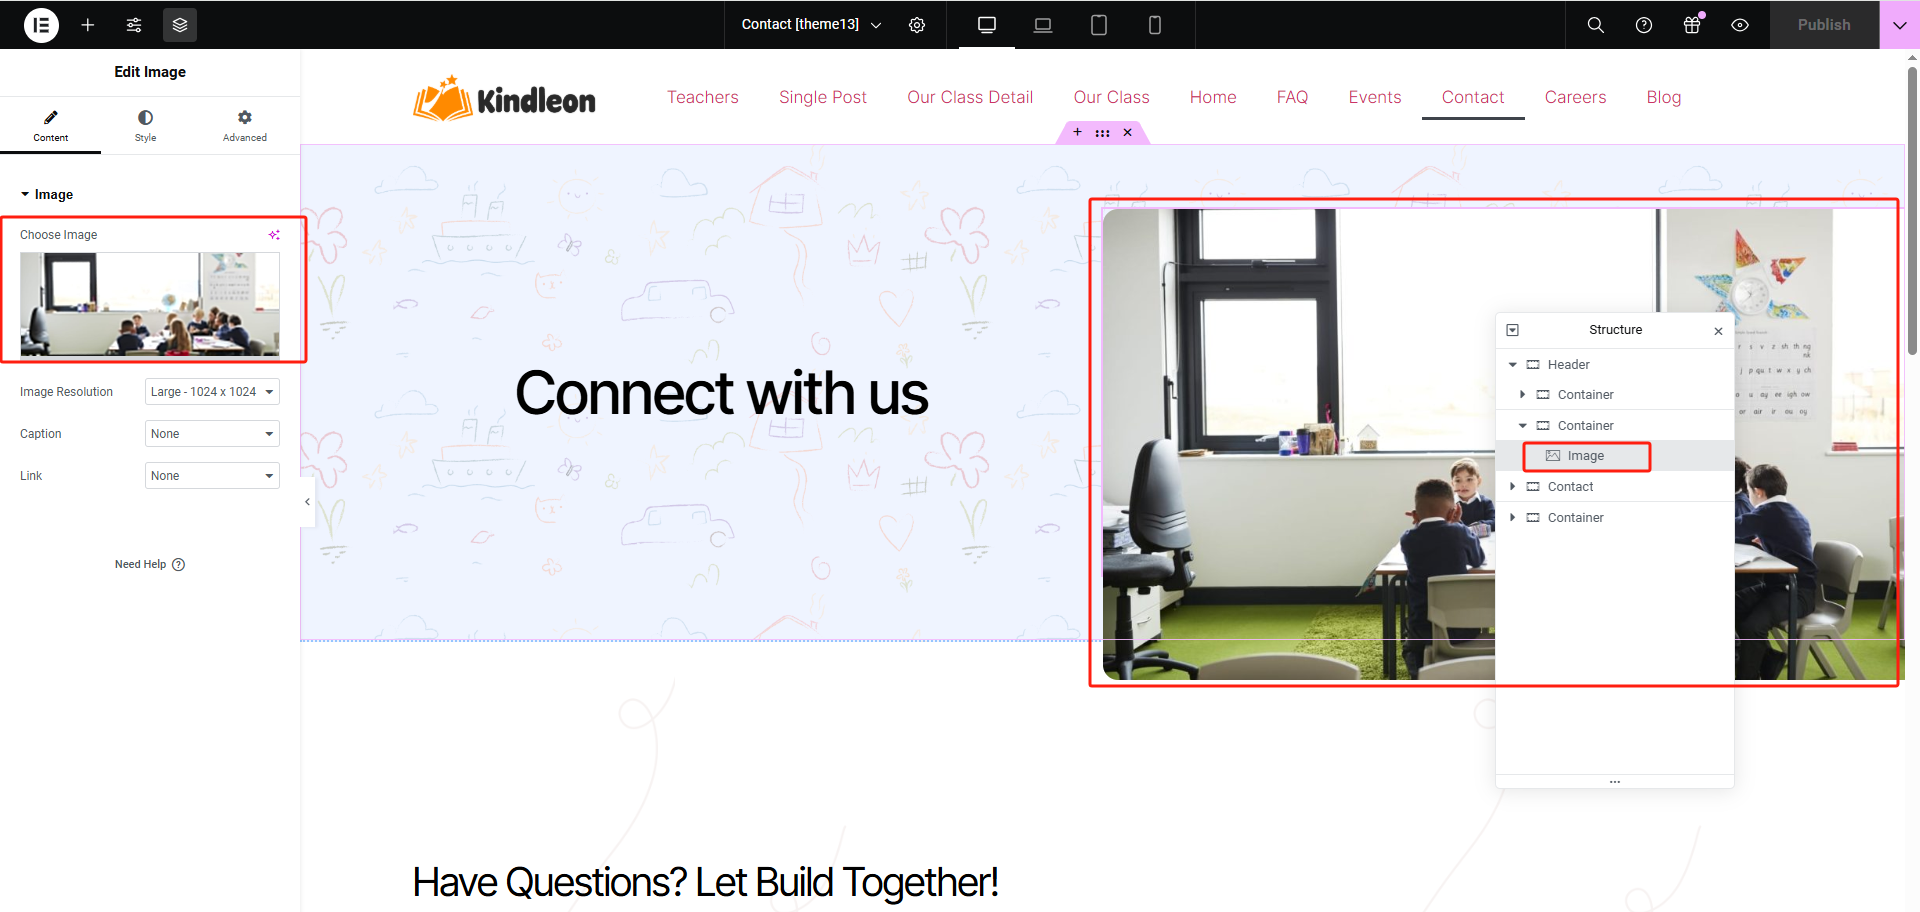
3. Begin Editing in Elementor
You will be redirected to the visual page builder. Here you can:
- Click on text blocks to change the heading (e.g., "Connect with us")
- Click on images to replace them with your own
- Use the left panel to style, adjust spacing, change fonts, etc.
📷 See Screenshot #3 & #4 – Edit text and image blocks
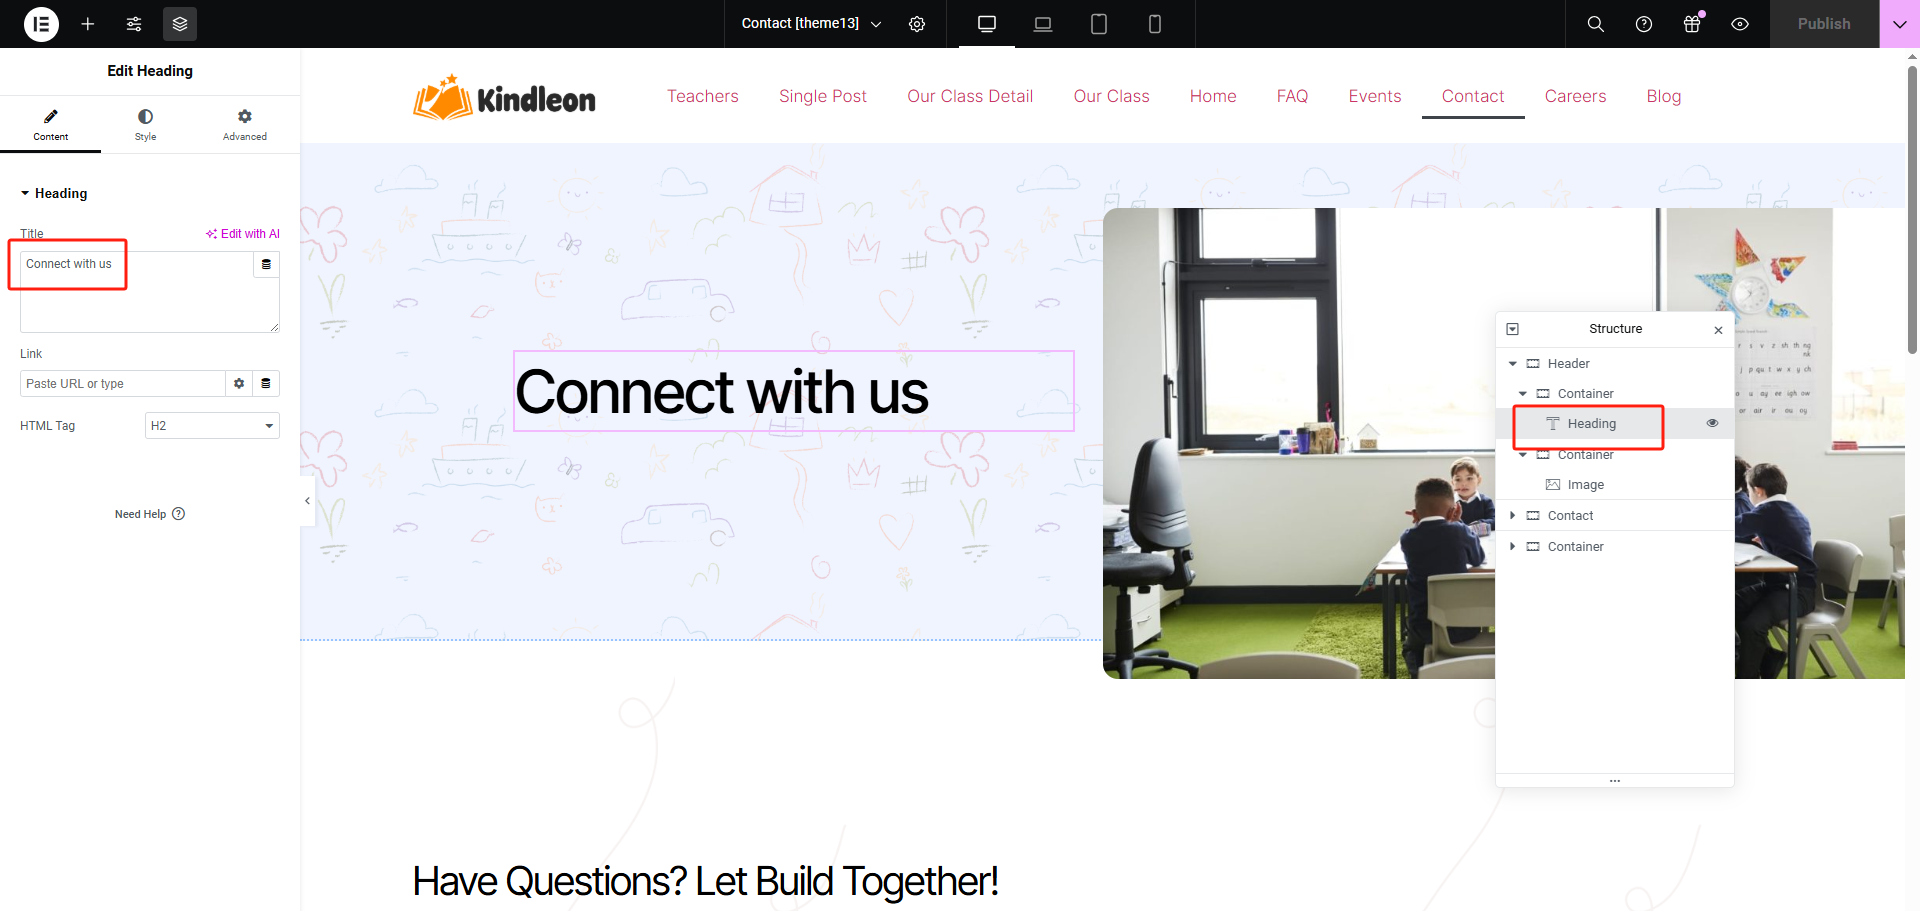
4. Modify Google Maps Location
- Scroll to the map section
- Click the pencil icon in the top-right corner of the Google Maps widget
- In the left panel, update the Location field (e.g., change to your school’s address)
📷 See Screenshot #5 – Update Google Maps Location
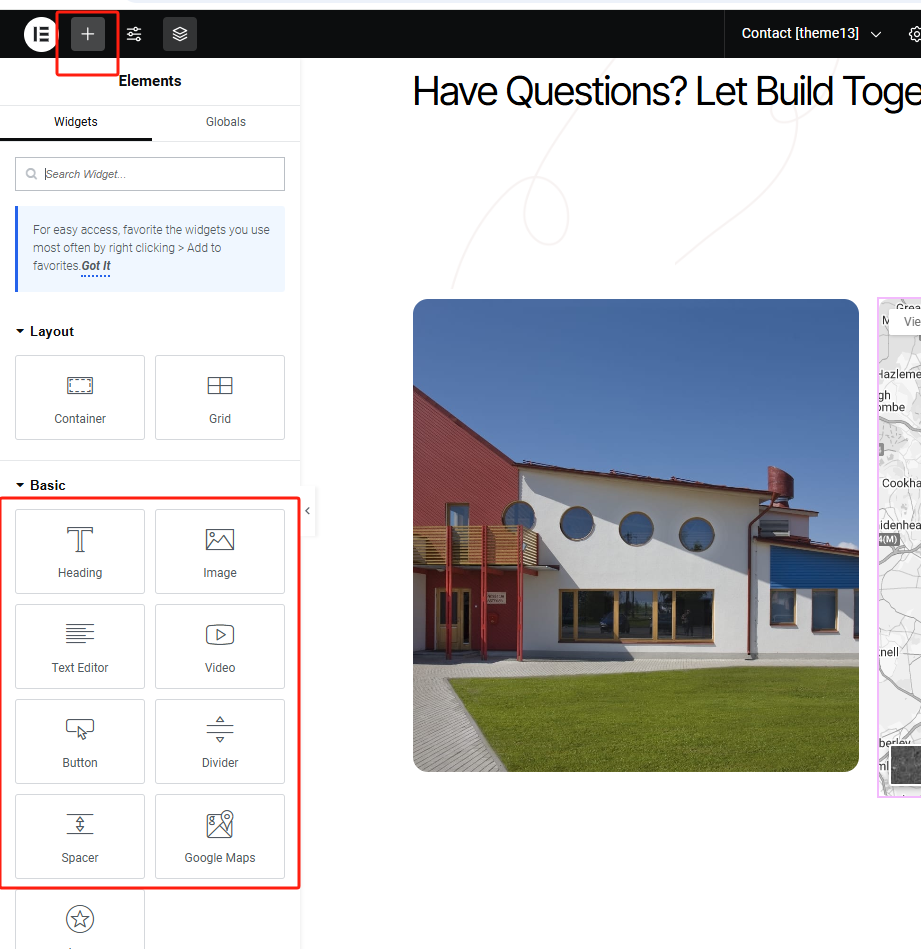
5. Add New Elements (Optional)
- Click the “+” icon at the top to insert a new section
- From the Basic tab, drag in widgets like:
- Heading
- Image
- Text Editor
- Button
- Google Maps
📷 See Screenshot #6 – Widget Insertion Panel
💾 Save Your Work
Once editing is complete, click the Publish / Update button in the top-left to save changes.
✅ Tips & Reminders
- Always double-check content after switching themes. Some layouts may look different across devices.
- You can preview your changes using the responsive mode (desktop/tablet/mobile).
- Use original images and texts — demo content is only for design reference.
Quick Edit a Page in WordPress
Efficiently Modify Title, Slug, Template and More
📌 When to Use Quick Edit?
The Quick Edit feature allows you to make basic changes to a page without opening the full editor. It’s perfect for quickly updating:
- Page title
- URL slug
- Template layout
- Visibility
- Publish status
- Author
- Page hierarchy (Parent)
✏️ How to Use Quick Edit
1. Hover Over the Page Title
- In the admin panel, go to Pages → All Pages
- Hover over a page name (e.g., “About [theme13]”)
📷 Screenshot #7 – Click “Quick Edit” from the options below the title
2. Modify Fields in the Quick Edit Panel
You’ll see an inline form with several editable fields:
| Field | Description |
|---|---|
| Title | The page title shown in navigation and browser |
| Slug | The URL portion after your domain (e.g., /about-us) |
| Template | Select Elementor Full Width, Elementor Canvas, etc. |
| Parent | Assign this page under another page (for hierarchy) |
| Order | Manually set the order for appearance in menus |
| Status | Change page status: Published, Draft, or Pending |
| Visibility | Set as Private or Password-Protected |
📷 Screenshot #8 – Quick Edit Form Interface

✅ Final Step: Click Update
After making your changes, don’t forget to click the blue [Update] button to save them.
⚠️ Quick Edit does not allow you to edit page content. To change text, images, or layout, use Edit with Elementor.
📌 This feature is especially useful for bulk clean-up, renaming demo pages, or assigning the correct page template.
📧 Need help editing other pages? Contact support at support@preschool.zone
MetForm – Managing Contact Forms
The MetForm plugin allows you to create, manage, and configure contact or enrollment forms on your preschool site. You can access it by clicking MetForm > Forms in the left menu.
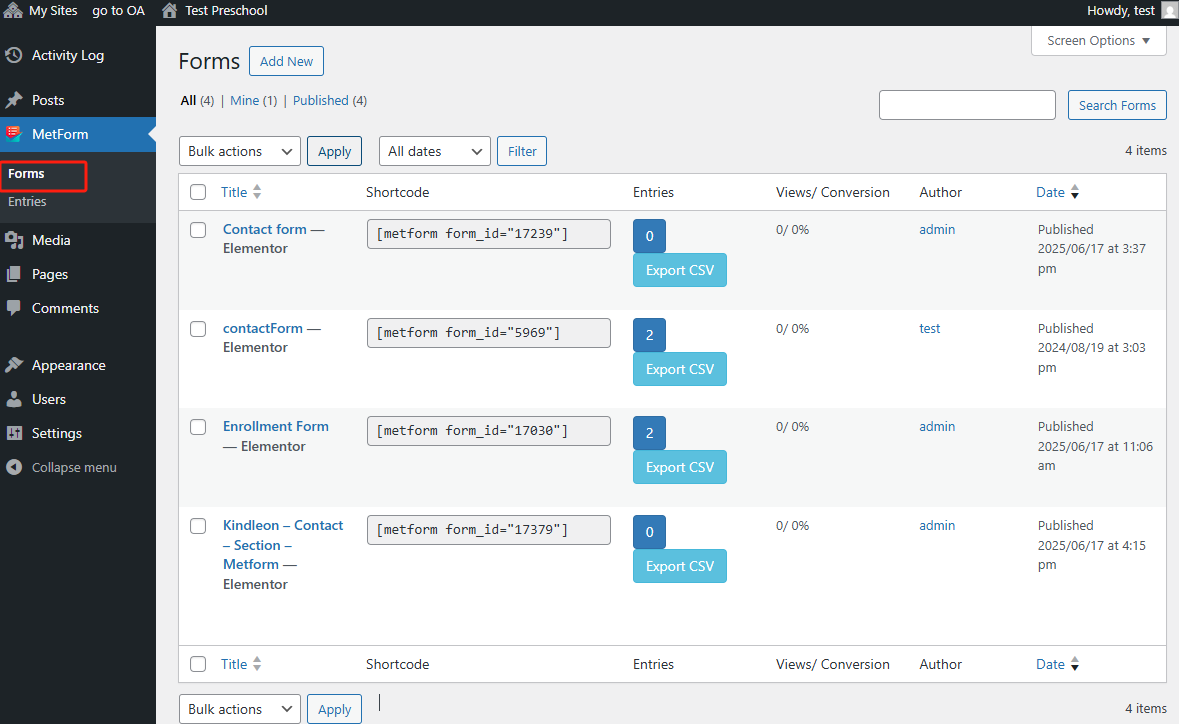
✅ View All Forms
Go to MetForm > Forms to see a list of all published forms. Each form shows:
- Shortcode: used to embed the form on a page.
- Entries: number of submissions received.
- Export CSV: export submission data for external review.
💡 You can verify form content by checking the form name and shortcode (e.g.
[metform form_id="5969"]).
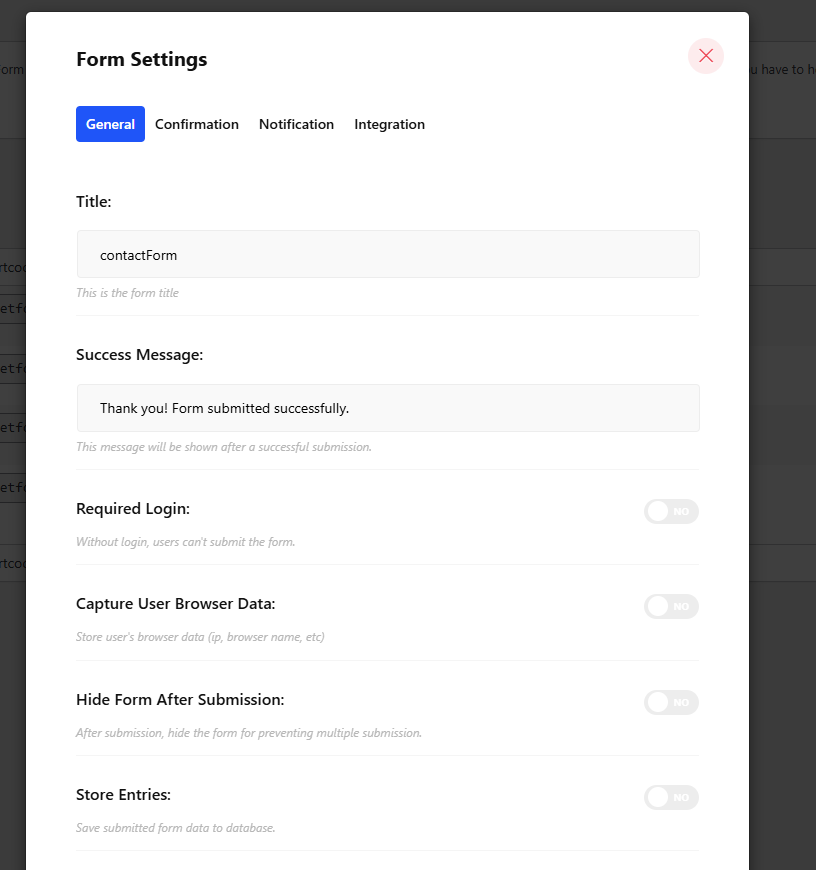
⚙️ Edit Form Settings
Click on a form name to open its Form Settings, where you can configure:
- General
- Success Message: shown after a form is submitted.
- Login Required: if enabled, only logged-in users can submit.
- Store Entries: toggle this on to save submission data.
- Confirmation
- Send an email copy to the user after they submit (requires a valid Email field in the form).
🎯 Most settings are optional. It’s common to leave confirmation emails off unless needed.
📩 Handling Form Submissions
You can view submissions by clicking Entries under each form. These submissions include contact details or enrollment requests from site visitors.
🔎 Note: After reviewing the form entries, staff members should verify the information. Once verified, you may follow up offline by phone or email as needed.
Edit Header & Footer
When using Elementor-based themes, both the Header and Footer are shared components across all pages within the same theme. To edit them:
-
Navigate to any page (e.g., “Activities [theme13]”) and click 【Edit with Elementor】.
-
Hover your mouse over the header area. You’ll see a floating tab labeled Header with a ✏️ pencil icon.
-
Click on the pencil icon to enter Header edit mode.

-
After editing, click 【Update】 to save your changes. The updated header will automatically apply to all pages under the same theme.
-
To edit the footer, scroll to the bottom of the same page. Click the ✏️ pencil icon on the Footer block.
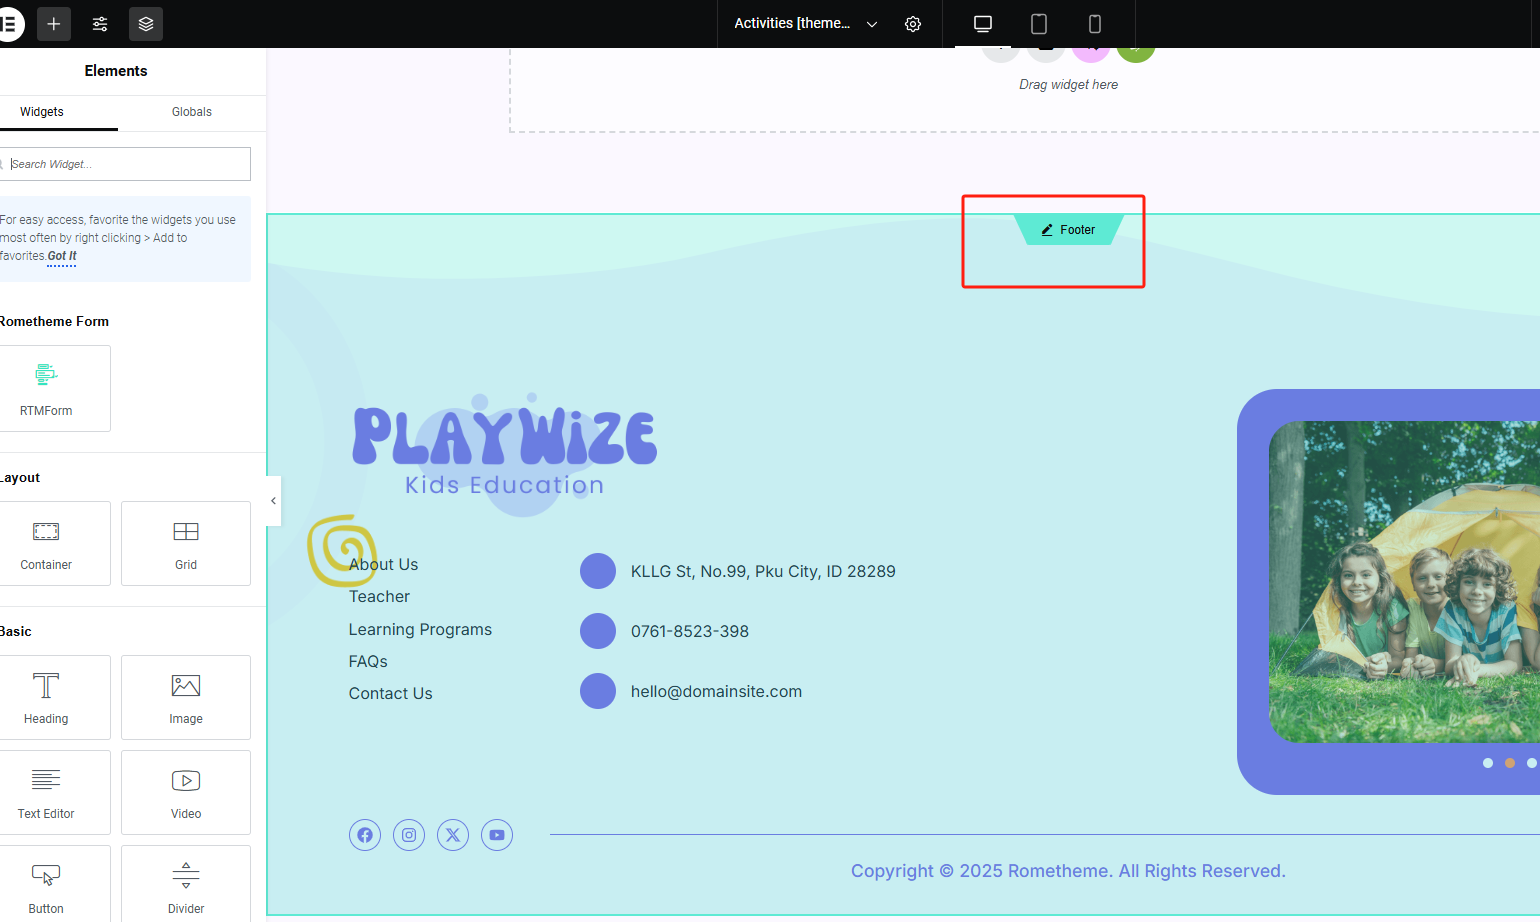
⚠️ Note: These shared sections are not page-specific. Editing them affects every page in the current theme.
Activity Log – View Operation History
The Activity Log module allows administrators to view a complete history of all user operations performed within the WordPress site — including post/page creation, updates, deletions, and login events.
1️⃣ Access Activity Log
-
From the left sidebar, click on 【Activity Log】 under the same name menu.
-
You’ll be taken to a dashboard that lists recent activities in chronological order.
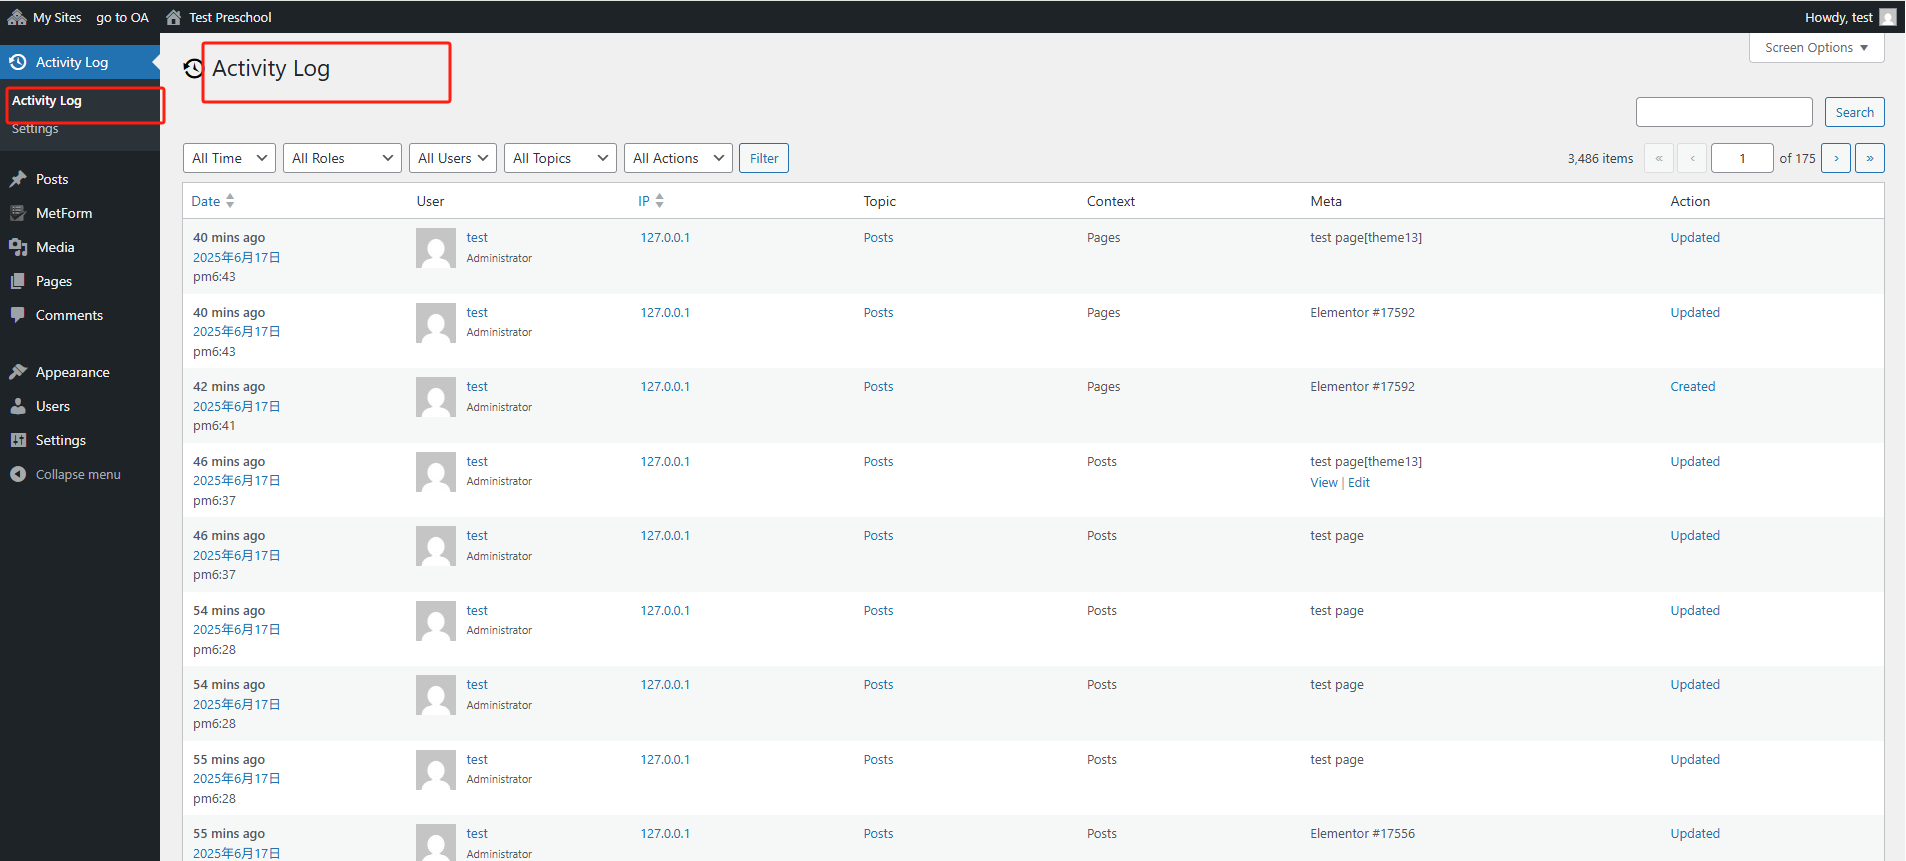
2️⃣ Understand the Log Table
Each row represents an individual action, with the following key information:
- Date: When the action occurred.
- User: Who performed the action (with username and role).
- IP: The IP address of the user.
- Topic: What type of content was affected (e.g., Posts, Pages).
- Context: Where the action happened (e.g., Elementor editor, Admin Panel).
- Meta: The specific item edited or created.
- Action: The type of activity (e.g., Created, Updated, Deleted).
3️⃣ Use Filters for Easier Navigation
At the top of the table, you can filter logs by:
- Time period
- User role
- Username
- Topic
- Action type
Click 【Filter】 to apply your selected criteria. This is especially useful when managing a site with multiple contributors.
✅ Use Case Scenarios
- Audit content changes across themes and pages.
- Track suspicious login activities or unauthorized changes.
- Ensure accountability among content editors.
⚠️ Note: This log cannot be manually edited, ensuring it serves as a reliable historical reference.
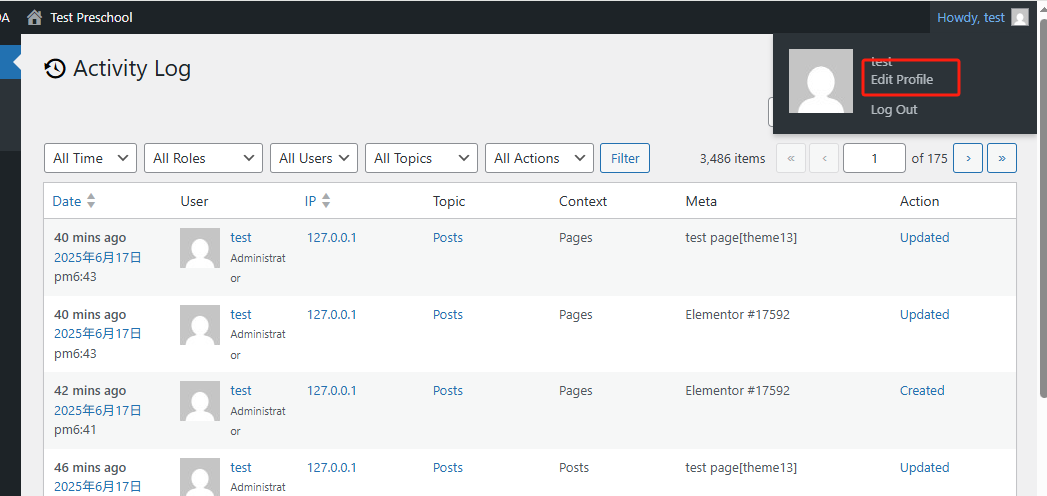
User Profile
This module allows users to view and update their personal information, including display settings, contact details, and password.
1. 🔧 Access Your Profile
- In the upper-right corner of the screen, click your username (e.g., test).
- From the dropdown, select 【Edit Profile】.
📍Refer to Screenshot 1.
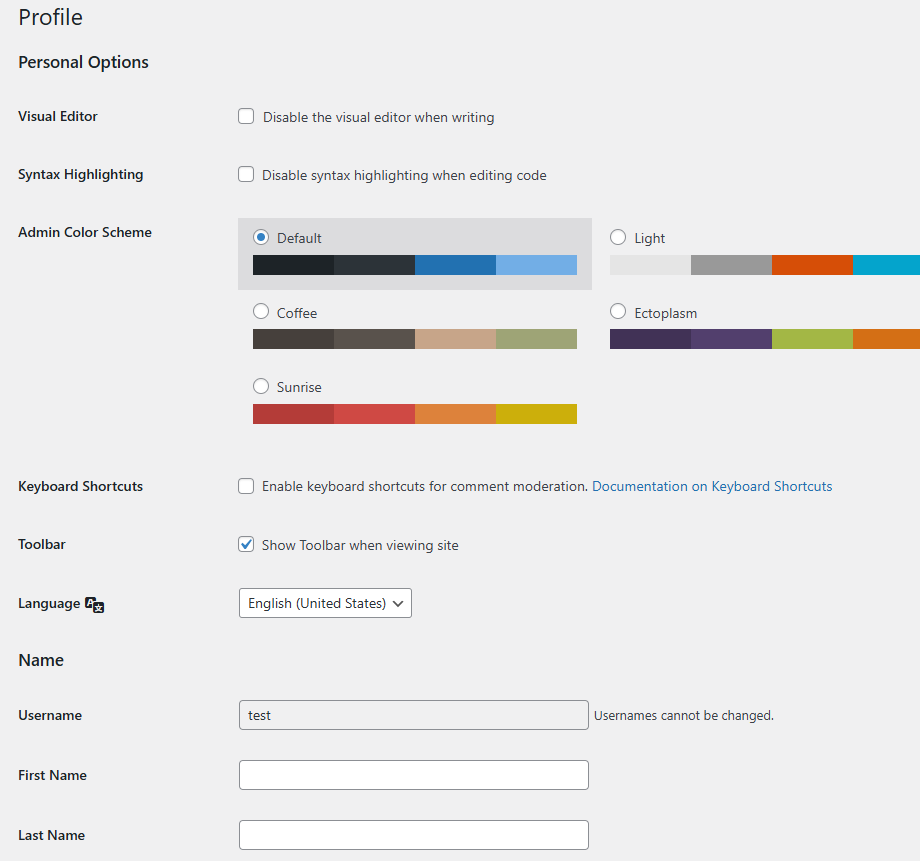
2. 🎨 Customize Personal Options
On the profile page, you can:
- Visual Editor: Disable the visual editor when writing (not recommended for most users).
- Syntax Highlighting: Enable or disable syntax highlighting in the code editor.
- Admin Color Scheme: Choose your preferred color theme for the WordPress dashboard.
- Keyboard Shortcuts: Enable moderation shortcuts (optional).
- Toolbar: Decide whether to show the admin toolbar when viewing the site.
- Language: Choose your dashboard display language.
📍Refer to Screenshot 2.
3. 📧 Update Contact Info
You can edit your basic contact details:
- Email: Change your account email address. A confirmation email will be sent.
- Website: (Optional) Add your personal or organization’s site link.
You can also:
- Add a short biographical info description.
- Change your profile picture using Gravatar.
📍Refer to Screenshot 3.
4. 🔐 Manage Account Security
In the Account Management section:
- Click 【Set New Password】 to change your login password.
- Click 【Log Out Everywhere Else】 to force logout from all other devices.
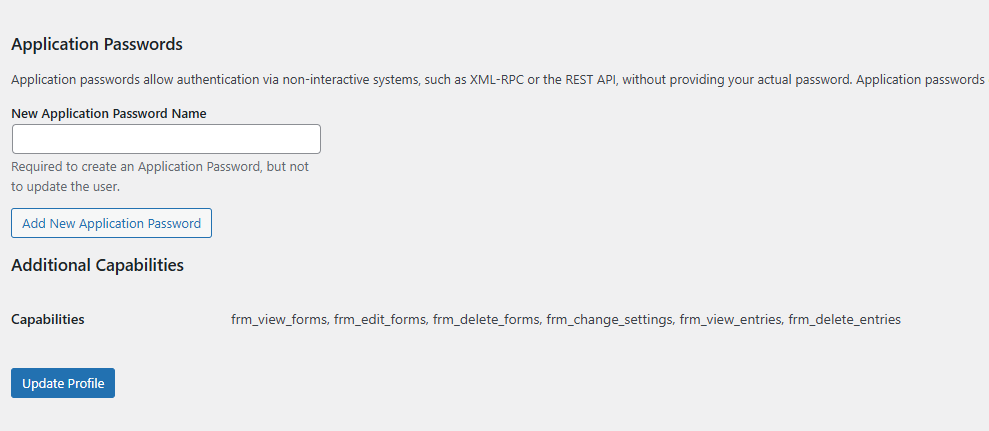
In the Application Passwords section:
- Create a new application-specific password for external integrations via REST API or XML-RPC, without exposing your main password.
At the bottom, your user capabilities are listed if applicable.
Finally, click 【Update Profile】 to save all changes.
📍Refer to Screenshot 4.
User Management
This section allows administrators to add existing users to the current website and assign them appropriate roles.
1. 📋 View All Users
Navigate to 【Users】 > 【All Users】 to see a list of all users currently associated with the site. You can view their usernames, email addresses, roles, and post counts.

2. ➕ Add Existing User
Click the 【Add Existing User】 button at the top of the user list to invite a user by email.
- Enter the email address of a registered user on the network.
- Select a Role from the dropdown menu.
- Click 【Add Existing User】 to send an invitation email.
📌 Note: The invited user must already exist in the multisite network to be added successfully.

3. 🧩 User Roles and Permissions
When adding a user, you must choose one of the following roles. Each has different permission levels:
| Role | Permissions |
|---|---|
| Subscriber | Can only read content and manage their own profile. |
| Contributor | Can write and manage their own posts but cannot publish them. |
| Author | Can publish and manage their own posts. |
| Editor | Can publish and manage all posts and pages, including those by other users. |
| Administrator | Full access to all site settings, including user management. |
System Settings – General
This section allows you to configure basic information about your website, including site title, icon, language, timezone, and date/time formats.
1. 🏷️ Edit Basic Site Information
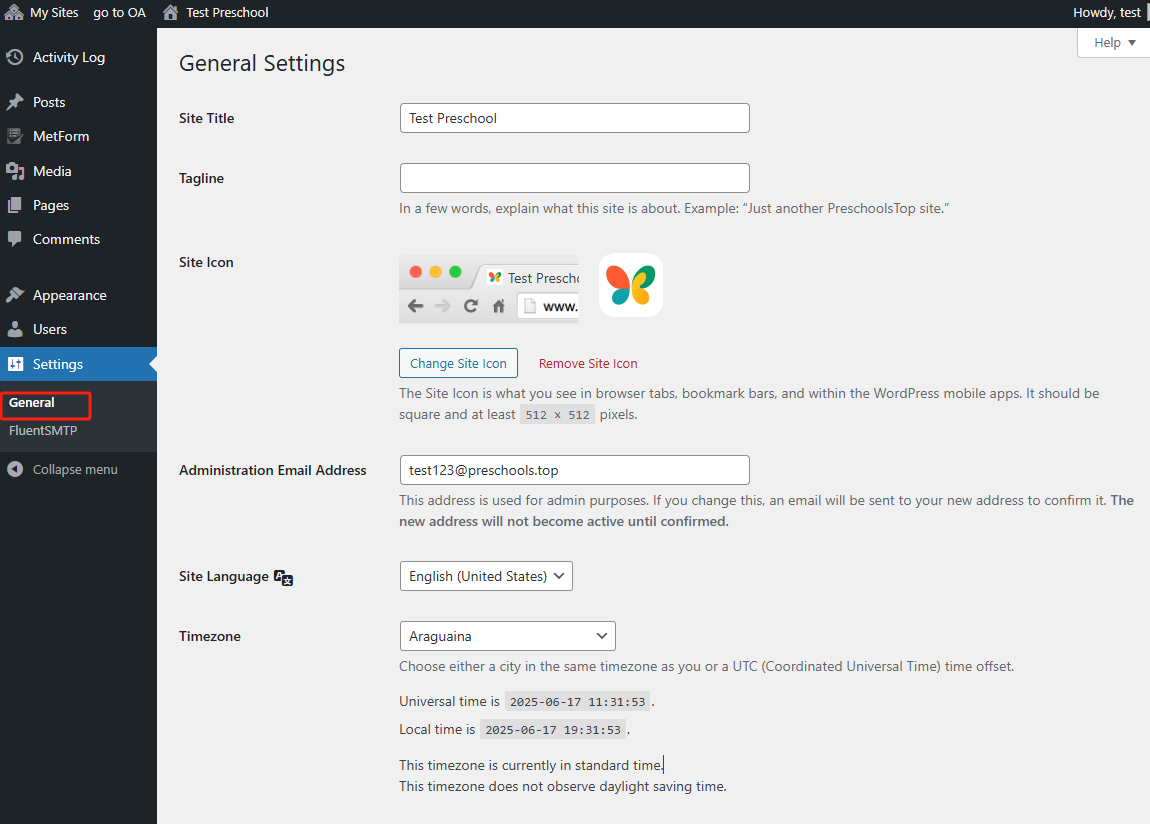
Go to 【Settings】 > 【General】 to update the following:
- Site Title: This is the name of your website, shown in the browser tab and various places across WordPress.
- Tagline: A short description or slogan for your site. (Optional)
- Site Icon: Also known as a favicon, this image appears in browser tabs and mobile bookmarks. Click 【Change Site Icon】 to upload an image. Recommended size is at least 512×512 pixels.
2. 📧 Set Administrator Email Address
- Administration Email Address: This email is used for admin notifications. When updated, a confirmation email will be sent to the new address. Note: The change won’t take effect until the new email is confirmed.
3. 🌐 Site Language and Timezone
-
Site Language: Set the language for the WordPress admin interface. For most U.S. users, the default is English (United States).
-
Timezone: Select a timezone based on your location (e.g., Araguaina). The system will automatically adjust time displays accordingly.
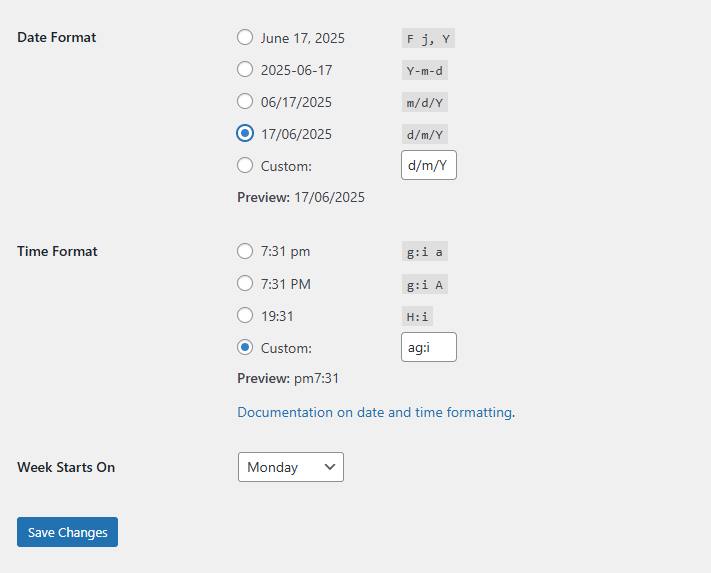
4. 🗓️ Configure Date and Time Format
You can customize how dates and times appear on your website:
- Date Format: Choose from preset formats (e.g.,
2025-06-17,17/06/2025) or enter a custom format. - Time Format: Supports both 12-hour and 24-hour formats. You may also enter a custom format (e.g.,
a g:ito display time aspm7:31). - Week Starts On: Choose the day your calendar week begins. Default is Monday.
After making changes, be sure to click the 【Save Changes】 button at the bottom of the page.
📧 Email Configuration (FluentSMTP)
FluentSMTP is used to configure your website’s email sending function, ensuring that system notifications (e.g., enrollment approvals, password resets) are reliably delivered.

1. Open FluentSMTP Settings
- Navigate to the left sidebar and click 【Settings】 > 【FluentSMTP】.
- On the main screen, select your preferred Email Service Provider (e.g., Gmail, Amazon SES, SendGrid, Other SMTP, etc.).
2. Fill in Sender Settings
In the Sender Settings section:
- From Email: Enter the email address you want to use for sending messages (e.g.,
noreply@yourdomain.com). - From Name: This name will appear as the sender name in recipients' inboxes.
- Keep both checkboxes checked:
- ✅ Force From Email (Recommended)
- ✅ Set the return-path to match the From Email
3. Configure SMTP Details
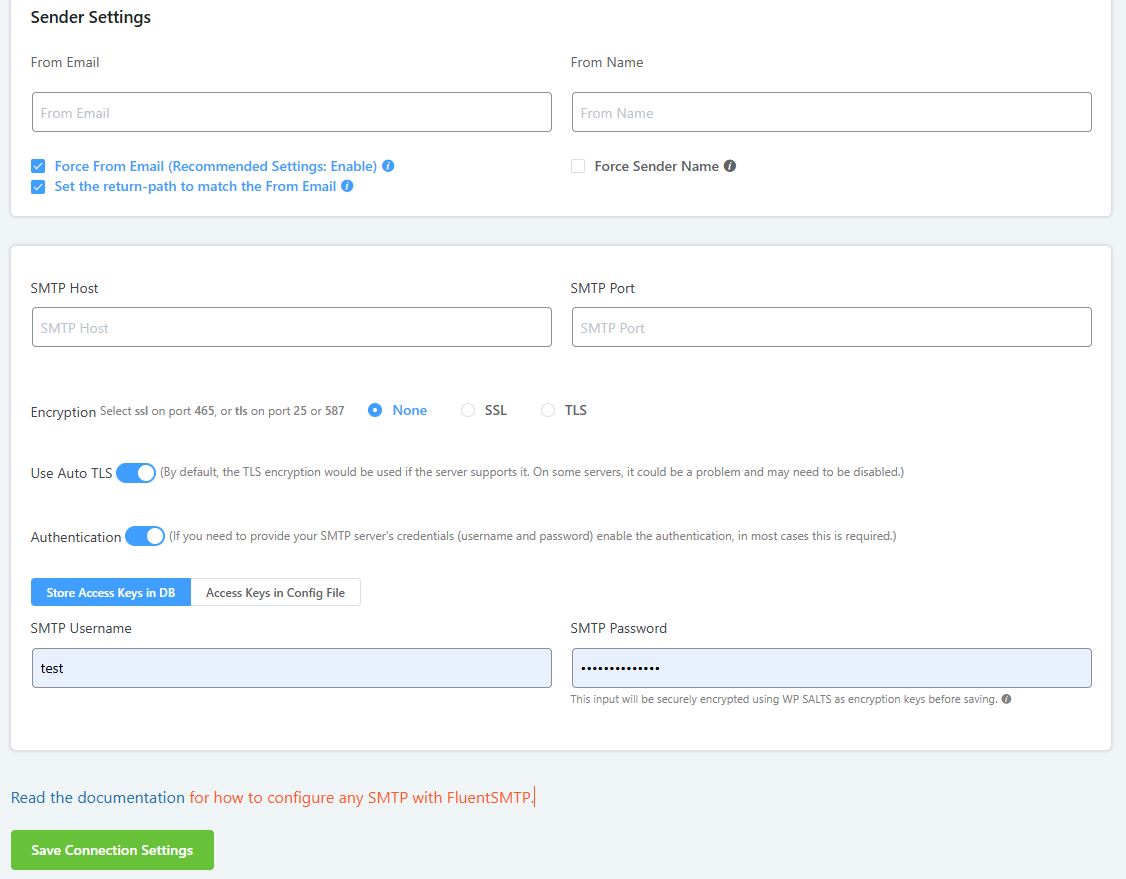
Scroll down to the SMTP Settings section and fill in:
- SMTP Host: Your mail server address (e.g.,
smtp.gmail.com). - SMTP Port: Usually
587for TLS,465for SSL, or25for no encryption. - Encryption: Choose
SSL,TLS, orNonebased on your provider. - Auto TLS: Leave it enabled unless your provider requires otherwise.
- Authentication: Enable it to enter your credentials:
- SMTP Username: Your email username.
- SMTP Password: Your email password (will be encrypted).
4. Save Your Settings
Click the green 【Save Connection Settings】 button at the bottom to apply your configuration.
ℹ️ Need Help?
If you are not sure how to configure your email settings, please contact our support team at 📮 support@preschool.zone – we’re happy to help you get it set up correctly.