Prerequisites
-
For the best editing experience, we recommend using a modern browser based on the Google Chrome engine (such as Chrome, Edge, or Brave) to access the website admin panel. Browsers like Safari or Internet Explorer may cause compatibility issues.
-
This website is built on WordPress and uses the Elementor page builder. To modify pages or manage content, users should be familiar with basic web editing operations.
-
Before logging into the admin panel, ensure you have an account with Administrator or Editor privileges. If you need a new account, please contact your site administrator.
-
Before launching the website, please prepare the following materials:
- School/center logo and branding colors
- Website text content (e.g., About Us, Programs, Contact)
- Image assets (photos of your preschool, activities, classrooms, etc.)
- Course descriptions or enrollment information, if applicable
-
If you plan to connect third-party tools (such as Google Analytics, Facebook Pixel, or online registration forms), please prepare the required accounts and embed codes in advance.
-
For system-related inquiries, please contact: support@preschool.zone
Guide to Logging In & Resetting Your Password
I. Logging In
Open the app to access the login screen. Enter your account credentials:
- Type your account ID in the "Enter Account" field.
- Type your password in the "Enter Password" field (tap the eye icon to the right of the password field to show/hide the password). After verifying your information is correct, tap the blue "Login" button to attempt logging into the app.
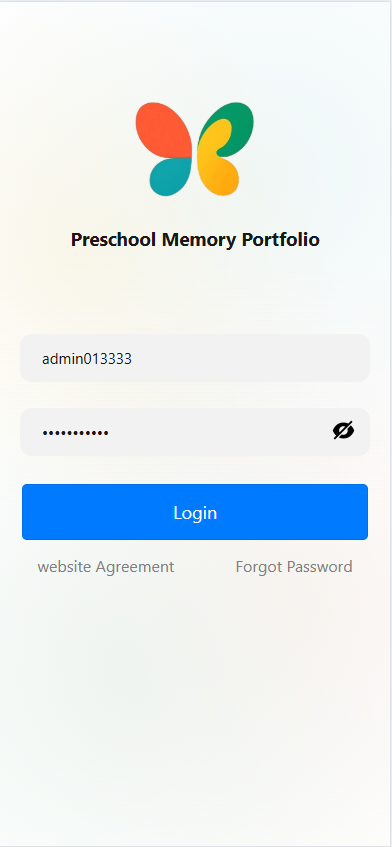
II. View Terms of Use (Privacy Policy)
On the login screen, tap "Website Agreement" to open the "Terms of Use" page. Here, you can review the privacy policy and other terms—including details about how personal information is collected, processed, and protected (e.g., compliance with the General Data Protection Regulation (GDPR)).

III. Resetting a Forgotten Password
If you forget your password, tap "Forgot Password" on the login screen to access the password reset page:
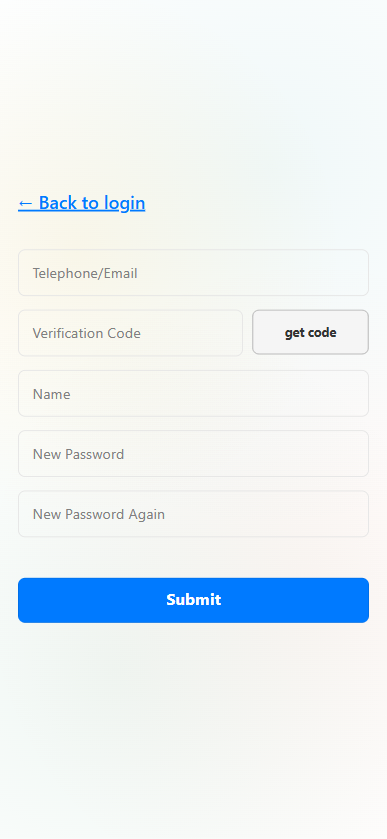
- In the "Telephone/Email" field, enter your registered phone number or email address.
- Tap "Get Code" to receive a verification code, then enter the code in the "Verification Code" field.
- Type your full name in the "Name" field.
- Create and confirm a new password: Enter your new password in both the "New Password" and "New Password Again" fields.
- Tap the blue "Submit" button to complete the password reset. You can then return to the login screen and sign in with your new password.
Guide to Viewing Messages
I. Access the Messages Page
Open the app and tap the "Profile" icon (far right in the bottom navigation bar) to enter your personal profile page. On the profile page, find and tap the "Message" option to open the message list.

II. Browse the Message List
Once in the "Sys Notifs" (System Notifications) page, you will see a list of messages. Each entry displays:
- The message title (e.g., "System Message Example 1").
- A preview of the message content.
- The send date (e.g., "2025-01-08").
- The read status ("Readed" indicates the message has been opened).

III. View Message Details
In the message list, tap any message you want to read (e.g., "System Message Example 1") to open its details page. Here, you can view:
- The sender (e.g., "James").
- The creation time (e.g., "2025-01-08 15:08:04").
- The full message content (e.g., "Message from admin@preschool.zone: System message content example 1").

IV. Return to the Message List
After reading the message details, tap the "Back" button at the bottom of the page to return to the message list and continue browsing other notifications.
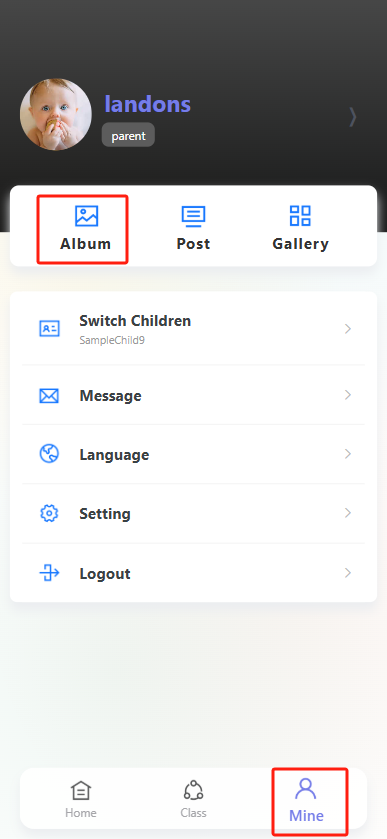
Guide to Switching Between Children Profiles
I. Access Your Personal Profile
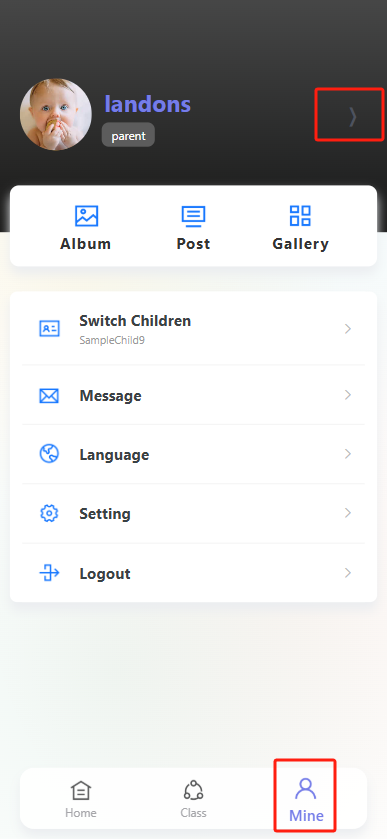
After opening the app, tap the "Profile" icon (far right in the bottom navigation bar) to enter your personal profile page.
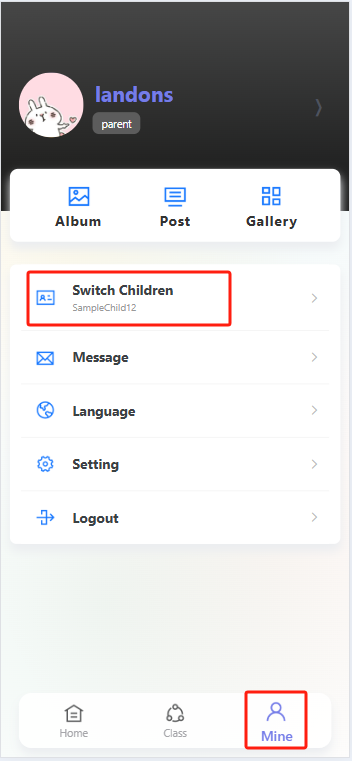
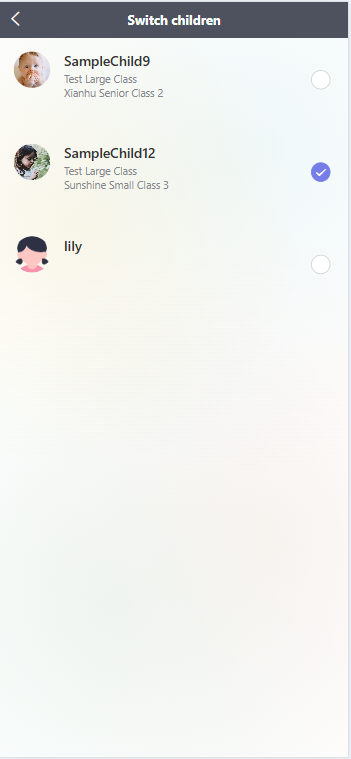
II. Select a Child
On the profile page, find and tap the "Switch Children" option. Once on the child selection page, you will see a list of your children—each entry has a circular selection button on the right. Locate the child whose information you want to view, then tap their corresponding circular button until a checkmark appears to confirm selection. This completes the switch, and you can now view that child’s related information.
Guide to Editing Personal Information
I. Access the Personal Information Page
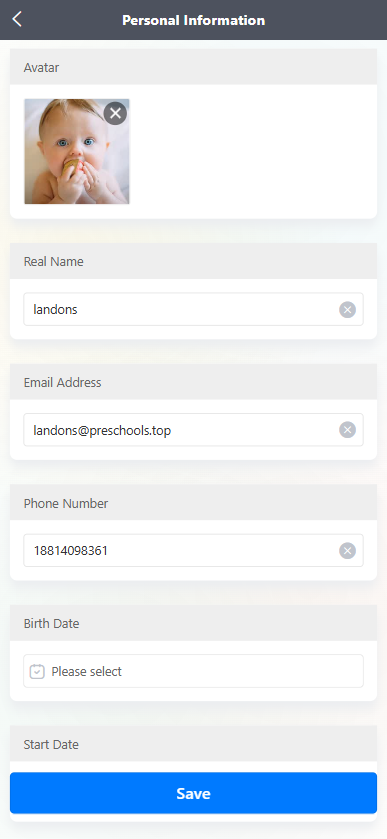
Open the app and tap the "Profile" icon (far right in the bottom navigation bar) to enter your personal profile page. On the profile page, tap the arrow icon next to your avatar to open the "Personal Information" page.
II. Edit Personal Information Fields
在 “Personal Information” 页面,可对以下信息进行编辑:
-
Avatar(头像):点击头像区域,可更换头像(若要移除现有头像,点击头像右上角的 “×”)。
-
Real Name(真实姓名):在姓名输入框中输入或修改姓名,点击输入框右侧 “×” 可清空现有内容。
-
Email Address(邮箱地址):在邮箱输入框中输入或修改邮箱,点击输入框右侧 “×” 可清空现有内容。
-
Phone Number(手机号码):在手机号输入框中输入或修改手机号,点击输入框右侧 “×” 可清空现有内容。
-
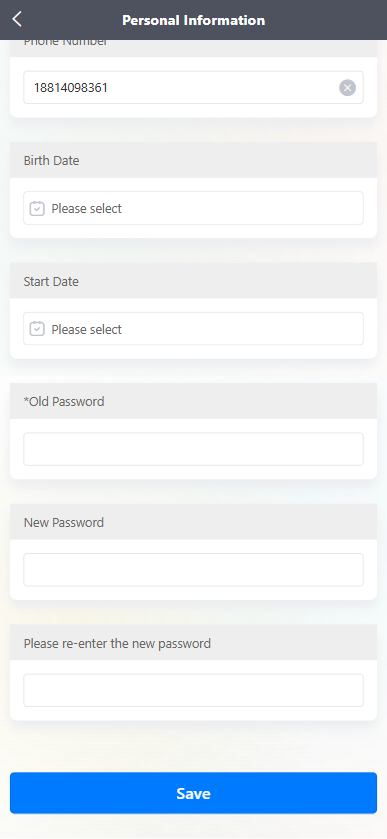
Birth Date(出生日期):点击 “Please select” 输入框,选择出生日期。
-
Start Date(开始日期):点击 “Please select” 输入框,选择相关开始日期。
-
密码修改:在 “*Old Password” 输入框中输入原密码,在 “New Password” 输入框中设置新密码,再在 “Please re-enter the new password” 输入框中重复输入新密码,完成密码修改操作。
III. Save Your Changes
After updating all desired information, tap the blue "Save" button at the bottom of the page to confirm and save your edits.
Guide to Managing Posts & Likes
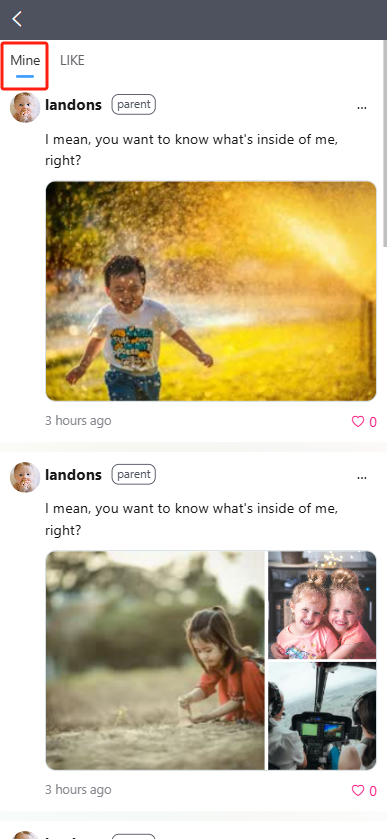
I. View Your Posts
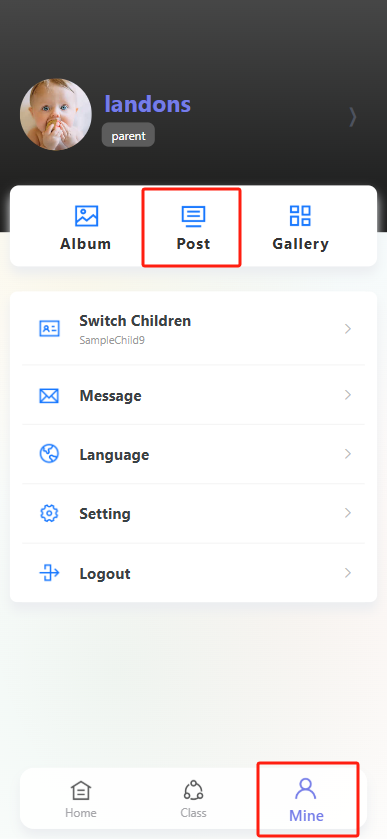
- Open the app and tap the "Profile" icon (far right in the bottom navigation bar) to enter your personal profile page.
- On the profile page, tap the "Post" option to open the Posts page.
- By default, the "Mine" tab is selected—here, you will see all posts you have published. Each post includes:
- Your text content.
- Any attached photos (if applicable).
- The post timestamp.
- The like count (e.g., "❤️ 0" means no likes yet).
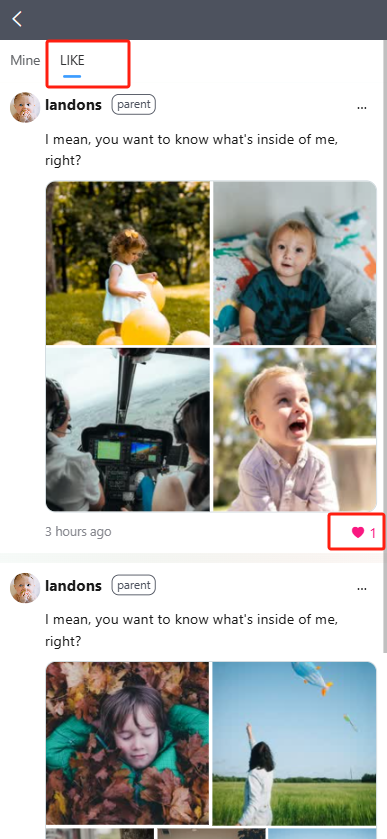
II. View Posts You’ve Liked
At the top of the Posts page, tap the "LIKE" tab to see a list of all posts you have previously liked.
III. Like/Unlike a Post
- For any post (yours or another user’s, if liking is enabled), tap the red heart icon in the bottom-right corner of the post:
- If the heart is empty: Tapping it will fill it in (solid red), and the like count will increase (e.g., from "❤️ 0" to "❤️ 1")—this means you’ve liked the post.
- If the heart is solid red: Tapping it will empty it, and the like count will decrease—this means you’ve unliked the post.
Guide to Posting to the School Feed
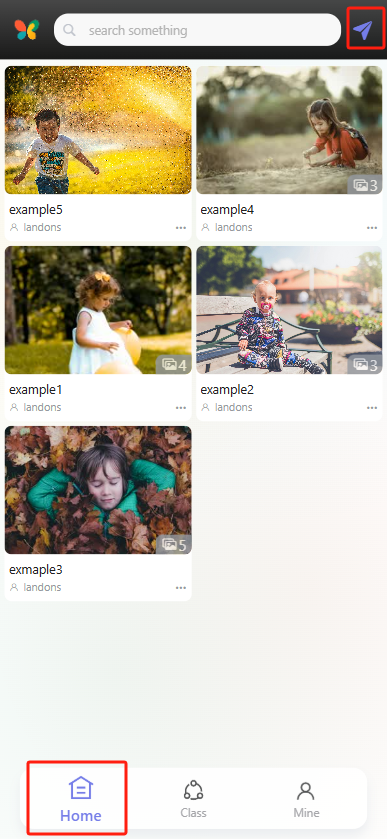
I. Access the Post Creation Screen
Open the app and tap the "Home" icon (leftmost in the bottom navigation bar) to enter the homepage. Next, tap the paper airplane-shaped "Post" button in the top-right corner to open the school feed post editor.
II. Edit Your Post Content
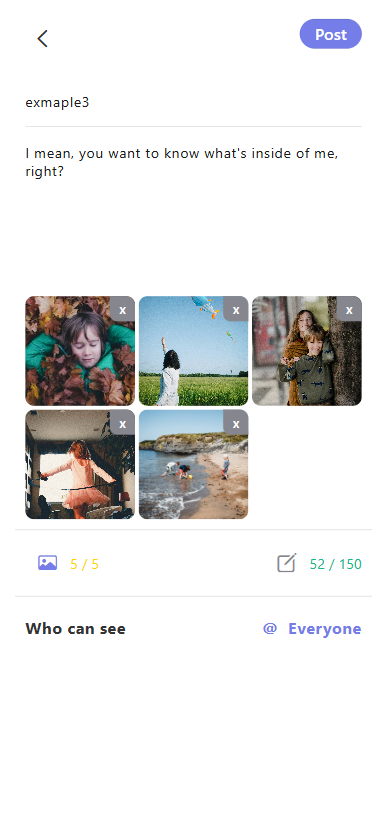
(1) Add a Title
In the "Write down title" input field, enter a title for your post (e.g., "Example 3" as shown in the demo).
(2) Write the Body Text
In the text area below the title, type the details of your post (e.g., "I mean, you want to know what's inside of me, right?" as shown in the demo). Maximum 150 characters (the demo shows 52 characters used).
(3) Add Photos
Tap the photo icon below the text area to select and upload photos from your phone’s gallery (maximum 5 photos). The demo shows 5 photos uploaded, marked "5/5." To delete an uploaded photo, tap the "×" in the top-right corner of the image.
III. Set Visibility
-
At the bottom of the post editor, tap "Who can see" to open the visibility menu:
- Select "Everyone": Post is visible to all members of the school (default/target visibility for school feed posts).
- Select "Only me": Post is visible only to you.
- Tap "Cancel": Abort the visibility selection.

IV. Publish the Post
确认标题、正文、图片及可见范围(选择 “Everyone”)设置无误后,点击界面右上角的 “Post” 按钮,即可成功发布校园圈动态。
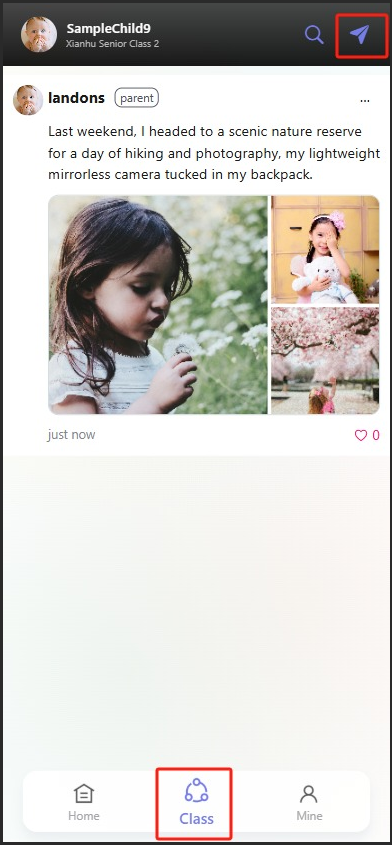
Guide to Posting to the Class Feed (For Parents)
I. Access the Post Creation Screen
Open the app and tap the "Class" icon (center of the bottom navigation bar) to enter the class page. Next, tap the paper airplane-shaped "Post" button in the top-right corner to open the post editor.
II. Edit Your Post Content
(1) Add a Title
In the "Write down title" input field, enter a title for your post (e.g., to note an activity theme or share a topic).
(2) Write the Body Text
In the "Write down content" input area, type the details of your post (e.g., describing your child’s in-class performance or sharing thoughts on the day’s lessons). Maximum 150 characters.
(3) Add Photos
Tap the photo icon below the text area to select and upload photos from your phone’s gallery (maximum 5 photos). To delete a selected photo, tap the "×" in the top-right corner of the image.

III. Set Visibility
- At the bottom of the post editor, tap "Who can see" to open the visibility menu:
- Select "Only my class": Post is visible only to members of your child’s class.
- Select "Only me": Post is visible only to you.
- Tap "Cancel": Abort the visibility selection.
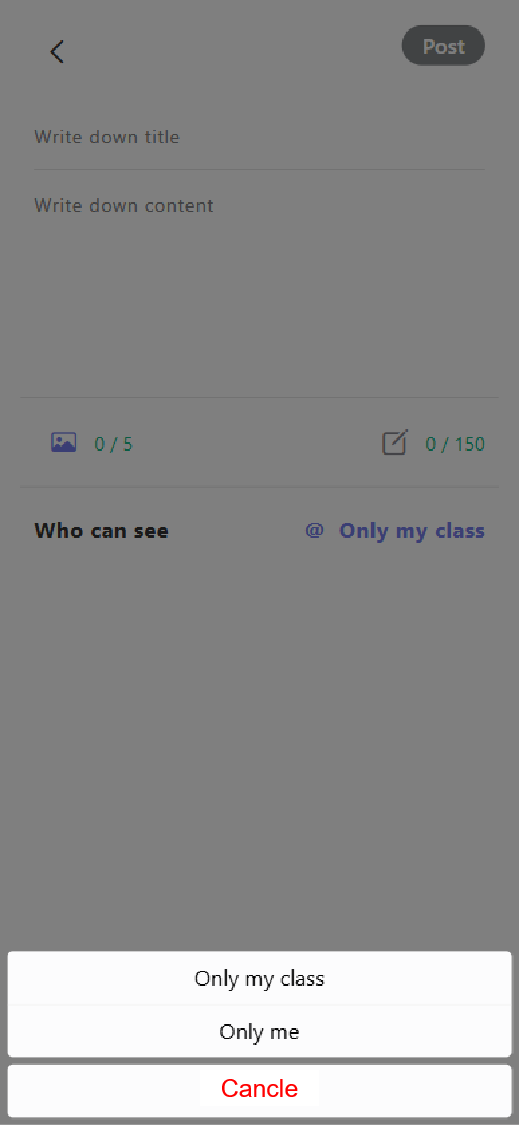
IV. Publish the Post
After confirming your title, body text, photos, and visibility settings are correct, tap the "Post" button in the top-right corner to publish your class feed post.
Guide to Using the Gallery Feature
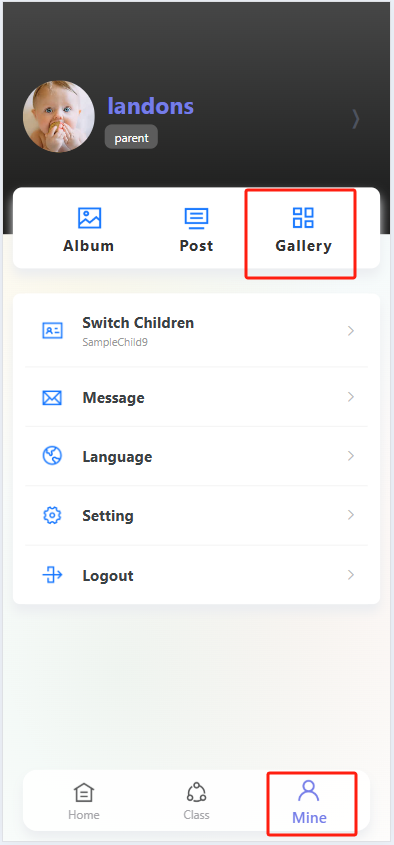
I. Access the Gallery Page
Open the app and tap the "Profile" icon (far right in the bottom navigation bar) to enter your personal profile page. On the profile page, find and tap the "Gallery" option to open the Gallery.
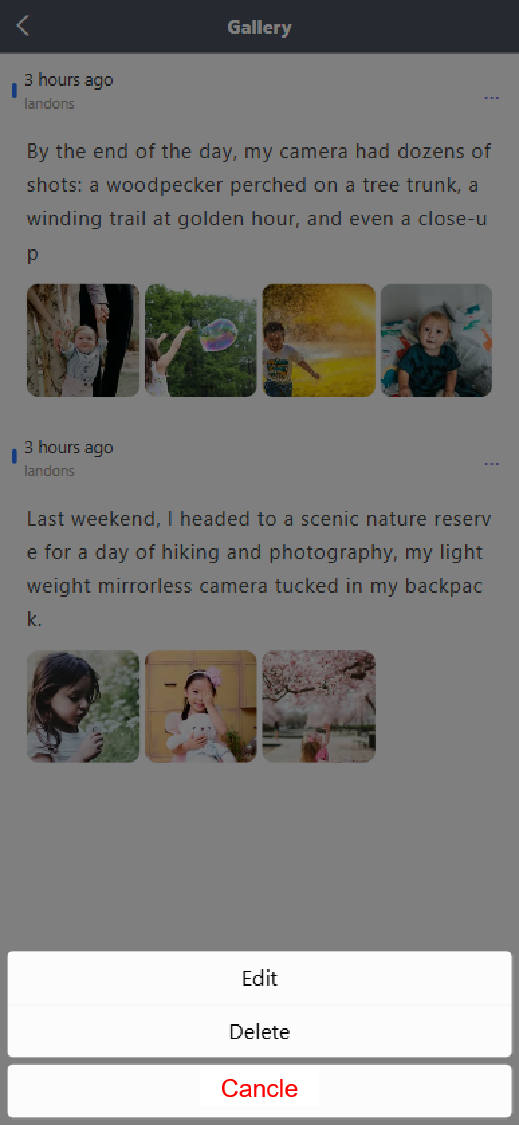
II. View Gallery Content
Once in the "Gallery," you will see a date-sorted list of photo-and-text posts. Each entry displays the post’s timestamp, author (e.g., "Landons" as shown in the demo), text content, and related photos—making it easy to review previously saved posts.
III. Edit and Save Posts to the Gallery
To re-edit a post and save it to the Gallery, follow these steps:
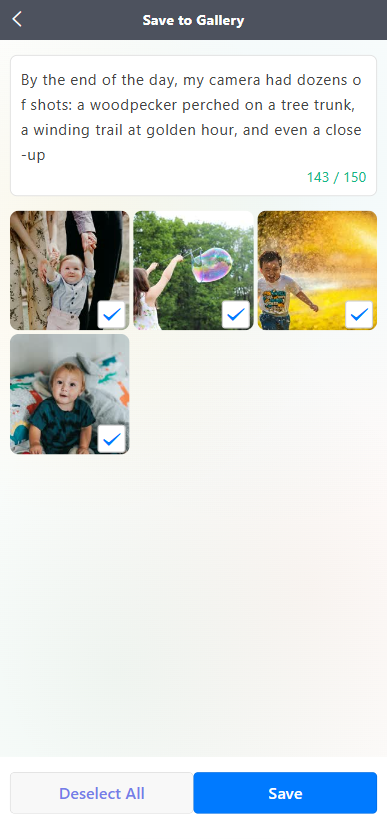
- Navigate to the "Save to Gallery" page. The top section shows the post’s text content (with a character count—e.g., "143 / 150" in the demo means 143 characters used, out of a maximum 150).
- The bottom section displays related photos. Each photo has a checkbox in the bottom-right corner—tap to select photos you want to save (selected photos show a blue checkmark). To deselect all photos, tap the "Deselect All" button.
- After confirming the text content and selected photos are correct, tap the blue "Save" button at the bottom of the page to save the edited post to your Gallery.
IV. Creating an Album
-
First, access the "Create Album" interface. Here, you can view the "Media Resource Type Count". After selecting the resources you want to include in the album, navigate to the "Album Template" selection page.
-
On the "Album Template" page, various templates are displayed by series (e.g., series1, series2, etc.):
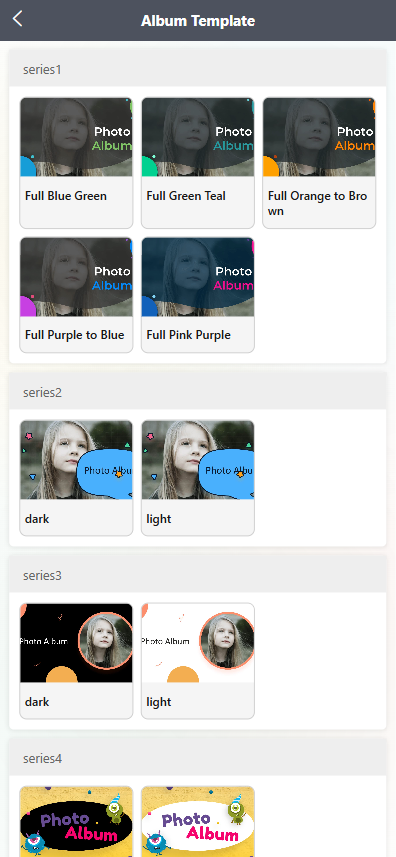
- Each series contains templates of different styles. For example, in series4, there is the "light" template (featuring cute monster elements and bright backgrounds) and the "dark" template (with a dark-color scheme).
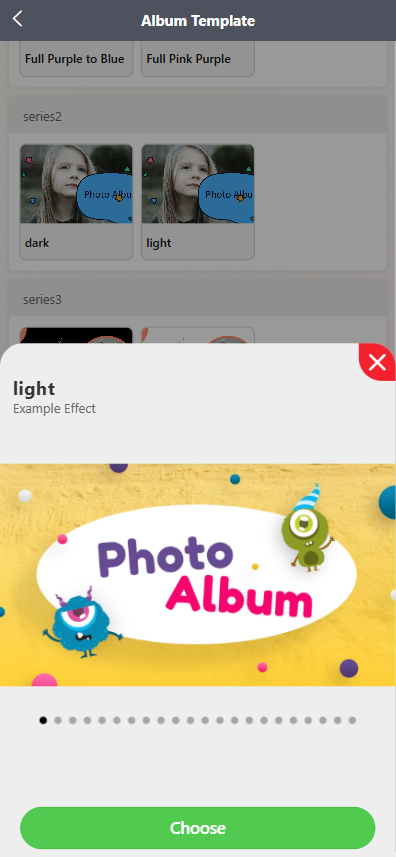
- Click on any template (e.g., the "light" template in series4), and a "Example Effect" preview window for that template will pop up. You can swipe the preview bar to view the multi-page display effect of the template.
-
Confirm and apply the template:
- In the template preview window, if you are satisfied with the template effect, click the green "Choose" button at the bottom to select this template for album creation.
V. Viewing the Final Album
After confirming the template selection, return to the Personal Center page. Click the "Album" option to view the album generated with the selected template (e.g., the "Photo Album" display with cute elements and the corresponding style).

Guide to Saving Posts to Album & Previewing Albums
I. How to Save Posts to Album
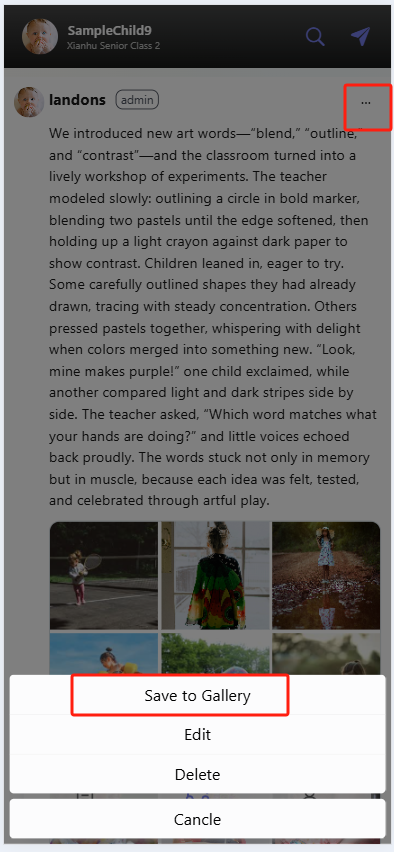
When browsing the Class Feed (posts under the "Class" tab), if you see a post from the teacher that features your child or contains meaningful content, you can save it to the album by following these steps:
- Locate the target post and tap the "⋯" (More Options) button in the top-right corner of the post.
- From the pop-up menu, tap "Save to Gallery" (this is a prerequisite for saving to the album) to prepare the post content for saving.
II. Accessing the Album to View Your Child’s Collection
-
Tap the "Profile" icon (far right in the bottom navigation bar) to enter your personal profile page.
-
On the profile page, tap the "Album" option.
-
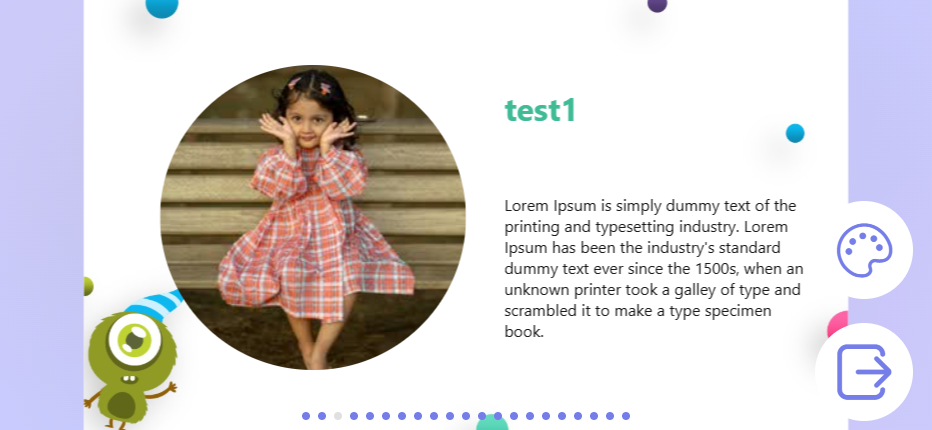
Once in "Album," you can preview your child’s organized growth album (displayed as a photo-and-text collection labeled "Photo Album") containing the posts you saved.
III. Album Preview
During preview, you can click "Template" in the bottom-right corner to switch to other templates. Users can swipe left or right to browse different pages, and click on an image to enlarge it or play a video.

Guide to Switching Between Classes (For Teachers)
I. Access Your Personal Profile
Open the app and tap the "Profile" icon (far right in the bottom navigation bar) to enter your personal profile page.
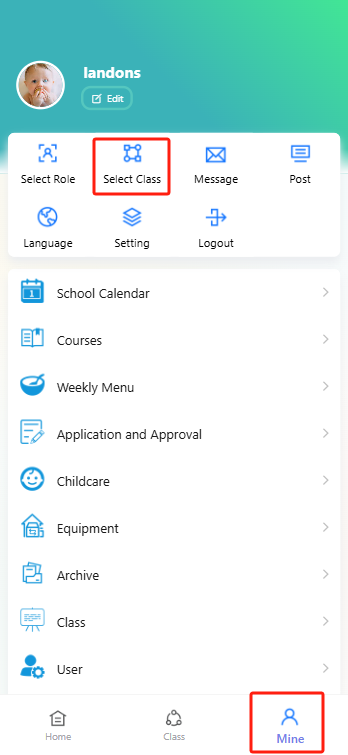
II. Select a Class
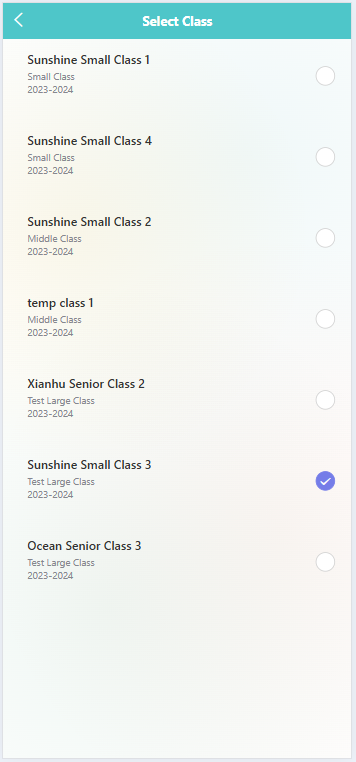
On the profile page, find and tap the "Select Class" option. Once on the class selection page, you will see a list of classes you teach—each entry has a circular selection button on the right. Locate the class you want to switch to, then tap its corresponding circular button until a checkmark appears to confirm selection. This completes the class switch.
Guide to Posting to the Class Feed (For Teachers)
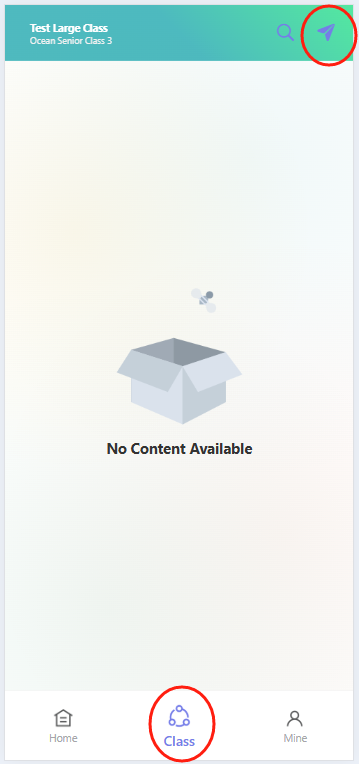
I. Access the Class Page
Open the app and tap the "Class" icon (center of the bottom navigation bar) to enter the class page. In the top-right corner of the class page, tap the blue paper airplane-shaped "Post" button to open the post editor.
II. Edit Your Post Content
(1) Add a Title
In the "Write down title" input field, enter a title that briefly summarizes the post (to help parents quickly understand the topic).
(2) Write the Body Text
In the text area below the title, type details about the post (e.g., describing children’s in-class activities or sharing teaching reflections) to keep parents informed.
(3) Add Photos
Tap the photo icon below the text area to select and upload photos from your phone’s gallery (e.g., photos of children participating in class activities) to visually showcase the classroom experience.
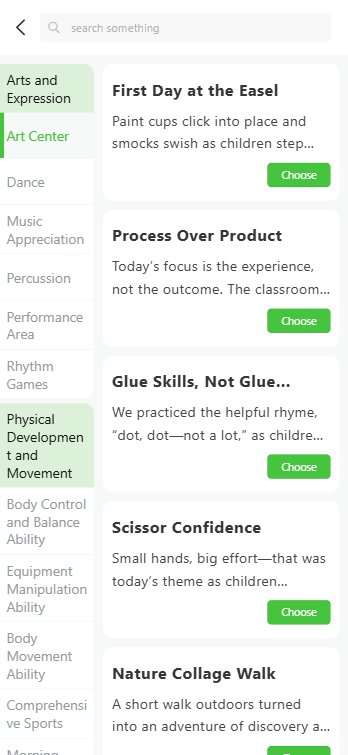
(4) Select a Text Template (Optional)
If a pre-made template fits your needs:
- Tap the paperclip-shaped icon next to the photo icon to open the template selection page.
- On the left sidebar, browse template categories by theme (e.g., "Arts and Expression," "Physical Development and Movement").
- On the right, select a specific template and tap the "Choose" button—the template content will auto-fill the body text area. You can edit the text to match your needs.

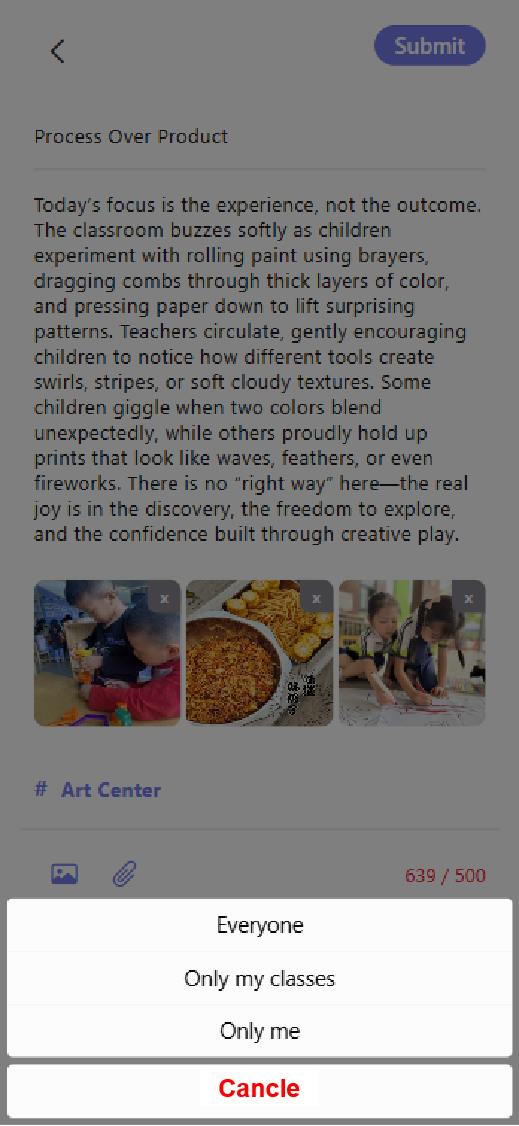
III. Set Visibility
At the bottom of the post editor, tap "Who can see" to open the visibility menu. Select an option based on your needs:
- "Everyone": Post is visible to all users.
- "Only my classes": Post is visible only to members of your class.
- "Only me": Post is visible only to you. Tap "Cancel" to close the menu after selecting.
IV. Publish the Post
After verifying your title, body text, photos, and visibility settings are accurate, tap the "Submit" button in the top-right corner to publish your class feed post.